Tracking Setup Guide
Getting Started
Tracking is the core of your Campaign and is the first things you'll need to do before starting your campaign. Accurate and robust tracking ensures that publishers have confidence in your campaign and that the validation of conversions/sales is an easy process.
Once Tracking has been implemented try the getting started guide.
Select a Tracking Method
You should select from the following methods:
- Server to Server (S2S) Tracking - sending conversions/sales via API (Recommended)
- Universal Tracking - using tags/scripts on your website
- Integrations - integrate with platforms like Google Tag Manager or Shopify
- Mobile App Tracking - add tracking & deep links to your mobile app
Optimise recommend using Server to Server (S2S) Tracking. This will ensure accuracy and provide maximum confidence to your Partners/Publishers.
Benefits
Our Advertisers use our technology to dive deeper into their data and gain greater insights on how customers convert. Our platform enables you to:
- Unlock your conversion funnel and optimise different Publisher channels
- Optionally integrate & activate Publisher technologies
- Mitigate the impacts of Apple ITP and Firefox Tracking Protection with 1st party cookies
- Capture data across all data points, journeys events and devices
- Build commission strategies based on any metric such as basket contents, voucher codes and many more
- Use our attribution modelling to unlock a deep understanding of how different channels interact with your Publishers
We also offer:
- A Controlled Data Exchange ensures you only share the right data with the right partners - we don’t profile and resell your customer data
- Fast and simple setup
- One click integrations with your Tag Management Partner such as Google Tag Manager & Ensighten
- Secure & robust platform tried & tested across our Global Advertiser Network
- An approach to data protection that is governed by our client’s obligations to their customers as well as strict regulation
- API Integrations with 3rd Party attribution providers
Key Points
- Ensure tags are added to any separate mobile sites
- Ensure conversion tracking is added mobile apps, see Mobile App Tracking
- Sale/Conversion confirmation tags must activate every time the post conversion thank you page loads (even if the user leaves the site and returns later on) to ensure multi-session conversions can be recorded
- Publishers’ sales are tracked within the conversion window/cookie duration
- Ensure you provide Optimise with any campaign analytics codes (eg. utm_source) or unique URLs
- If you are running your campaign with more than one affiliate network you should notify Optimise of the channel to which the conversion has been attributed
- If you are using Google Analytics see important information on campaign timeout settings.
- Ensure your setup mitigates the impact of Apple ITP & Firefox Enhanced Tracking Protection
- In the interest of security, we recommend that the Universal tags should not normally be added to any payment details' pages
Server 2 Server (S2S)
Optimise tags can also be implemented via Server 2 Server (S2S). This is the most robust method for installing a tracking tag. If your journey is across domains then please see the flow chart collapsed below:
S2S Crossdomains
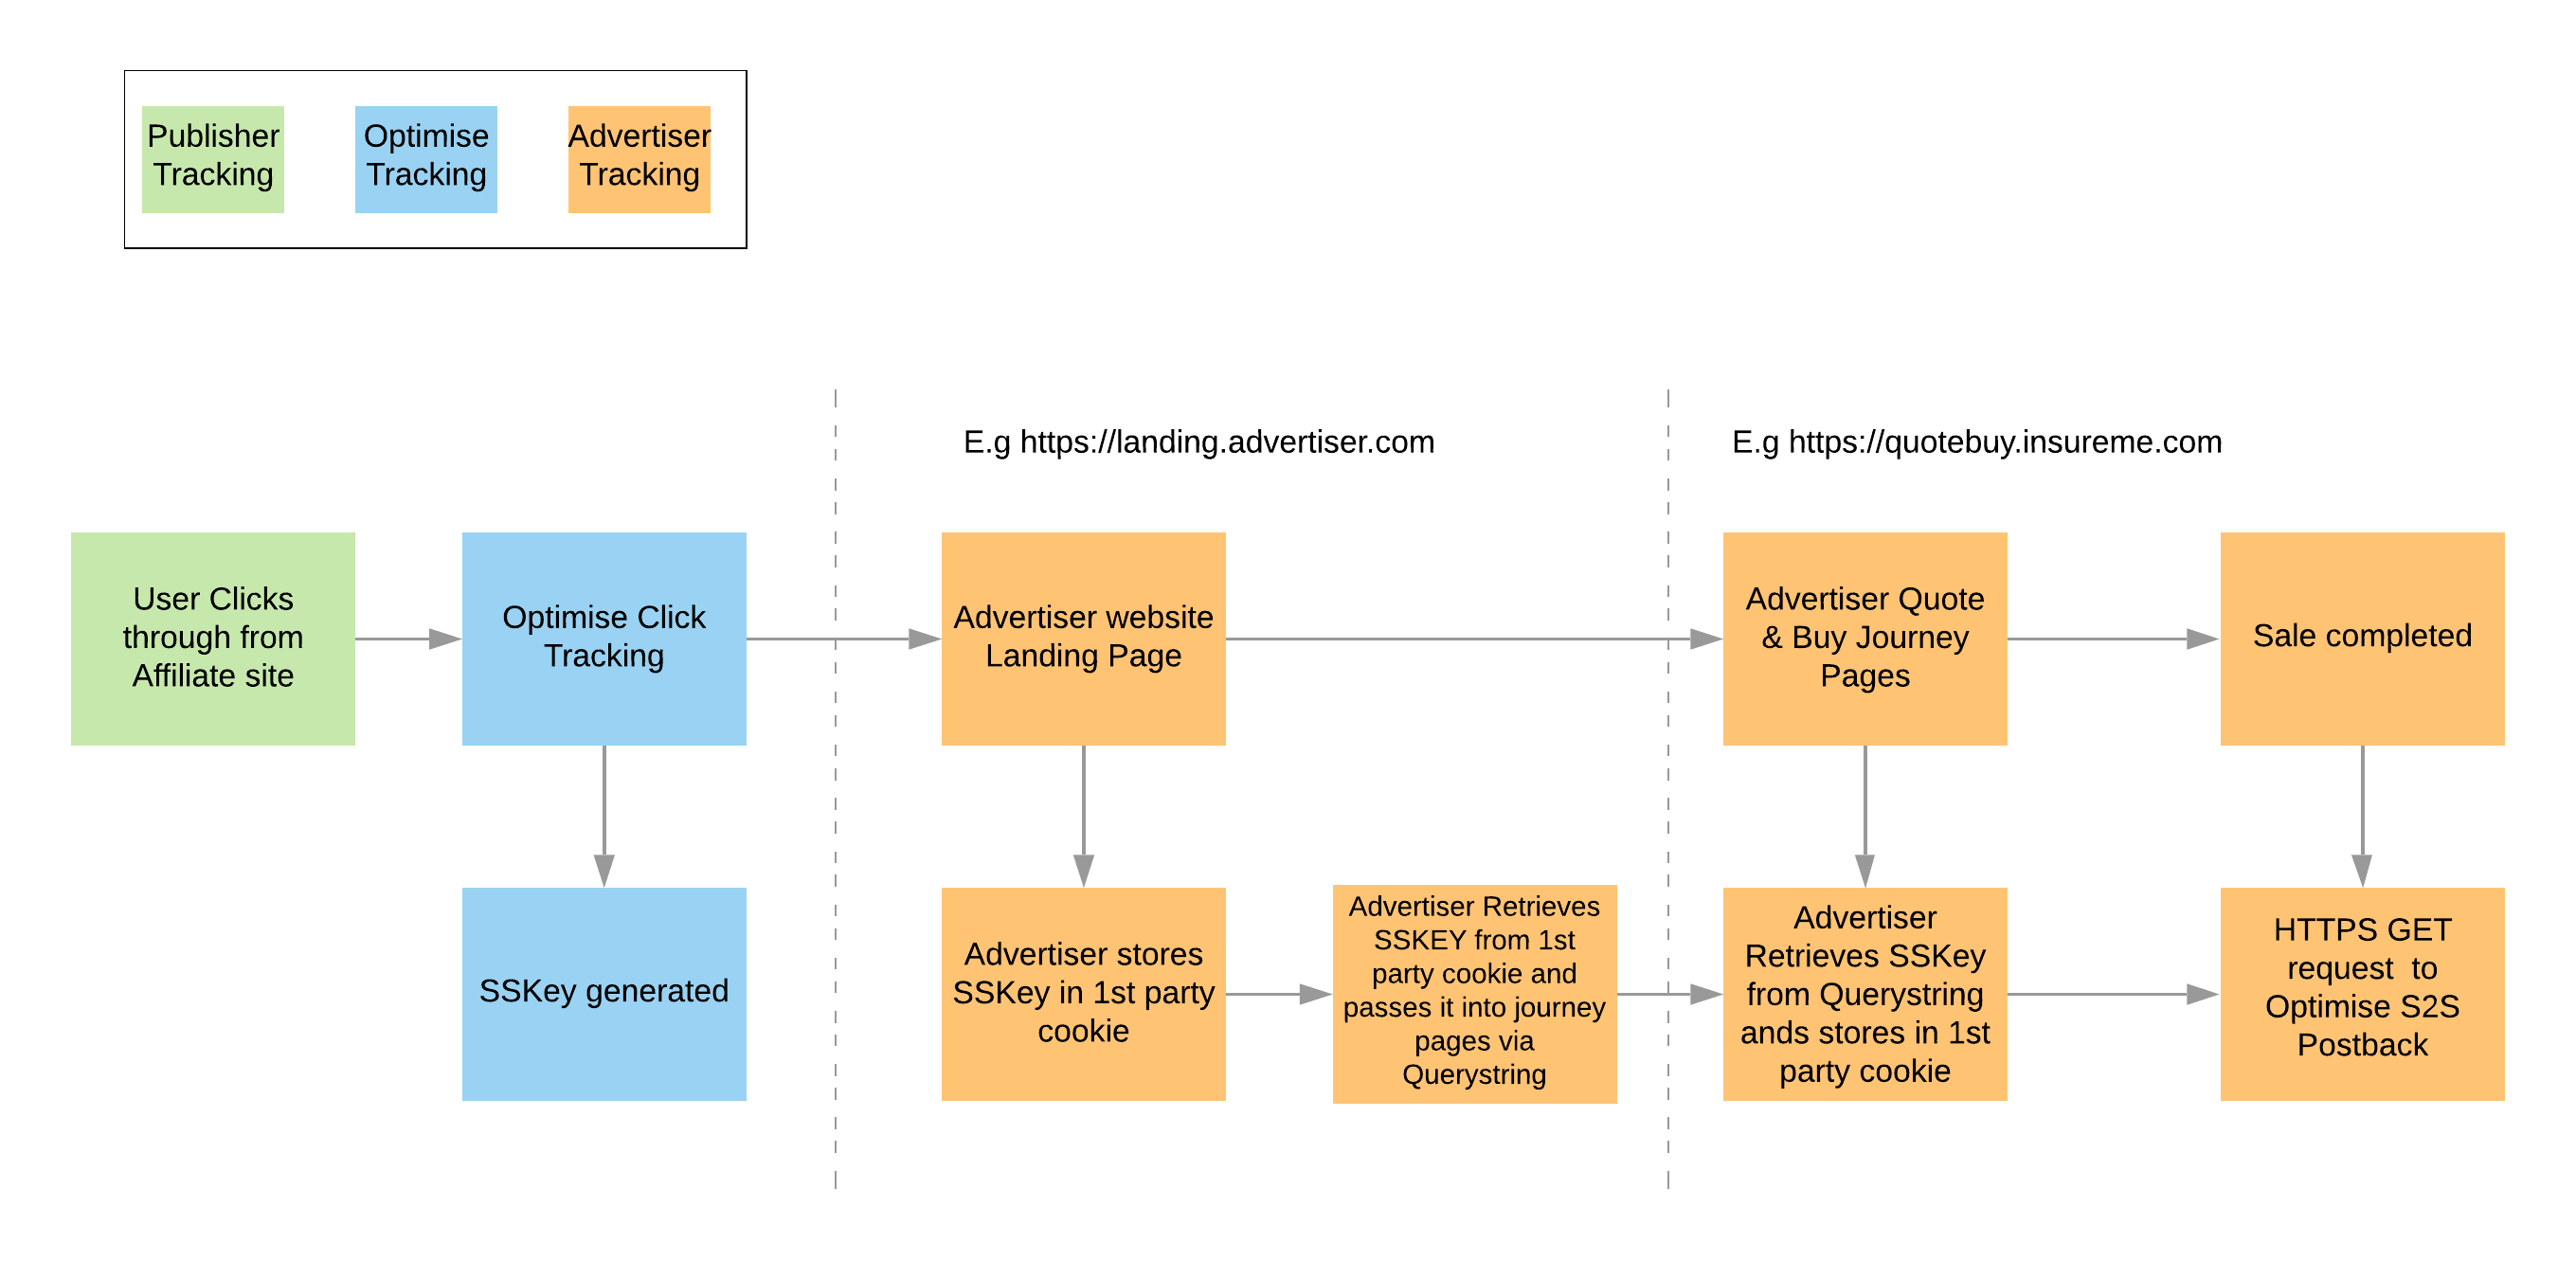
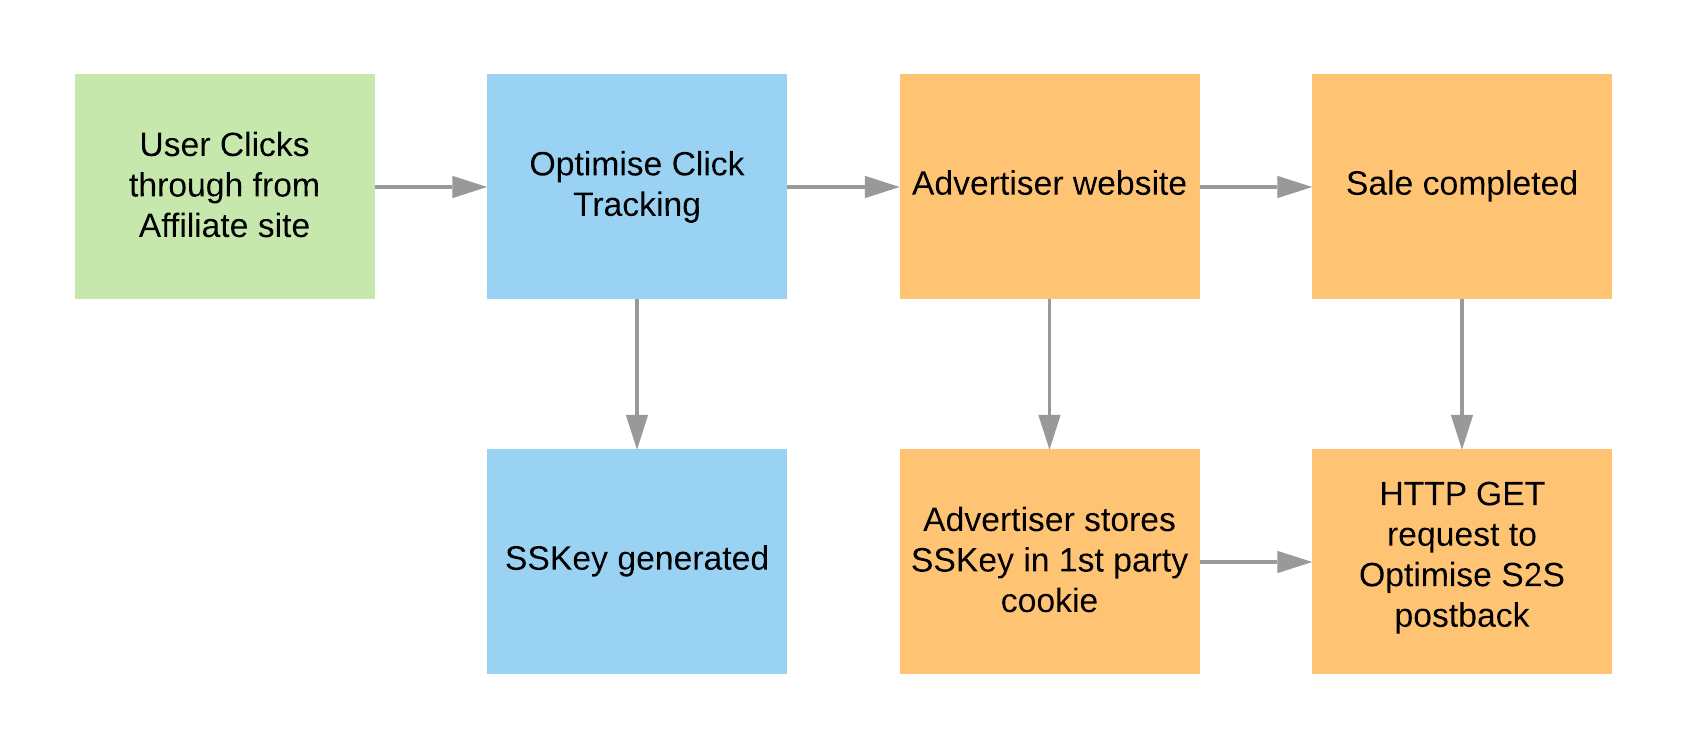
Capture SSKEY
To implement S2S Tracking a click reference (SSKEY) will be automatically be appended to every request to the landing page (or deep link) defined for the campaign.
Website example:
https://www.advertiser.com/?SSKEY=86a0a0b15e0143c8a14bd9c25628aecb
Mobile App example:
mobileapp://home?SSKEY=86a0a0b15e0143c8a14bd9c25628aecb
The SSKEY must be retrieved from the QueryString and stored in a local object and returned to Optimise when a conversion event takes place:
- For Web this should be a persistent cookie for 30 days (or the agreed attribution window for the campaign). The cookie should be a 1st party, secure, server-side cookie on the primary domain. eg. in the above example: advertiser.com
- For Mobile Apps this must be a persistent variable in local storage for 30 days (or the agreed attribution window for the campaign).
Build Request
The S2S Tag must be activated on the post-sale confirmation page of your site with the SSKEY from the cookie:
https://track.omguk.com/e/s/s2s/?AppID={SaleReference}&MID={MID}&PID={PID}&Status=&TransactionValue={TotalOrderValue}&SSKEY={SSKEY}&Channel=Optimise&CustID={CustomerID}&Vcode={VoucherCode}
This Postback is a GET Request, we do not currently support POST.
Additional parameters, such as Basket Item Tracking, may be appended to the URL as per the below Conversion Tag examples.
If possible, we still recommend adding the Universal Tag to your site to take full advantage of Optimise reporting capabilities, Market Intelligence and cross-device attribution (using CustID).
Universal Tracking
Our Universal Tracking consists of 2 components:
- Universal Tag – this is added to every page of your site
- Conversion Tag – this is added to the post-sale confirmation page of your site
Universal Tag Setup
Add the Universal Tag to the HTML of every page of your site. The tag(s) will be supplied by our Tracking Support Team.
Your Universal Tag will look like this example:
<script type="text/javascript">
OMID={MID};OPID={PID};ORef=escape(window.parent.location.href);
!function(){var a=document.createElement("script");a.type="text/javascript",a.async=!0,
a.src="//track.omguk.com/e/qs/?action=Content&MID=" + OMID + "&PID=" + OPID + "&ref="+ ORef;
var b=document.getElementsByTagName("body")[0];if(b)b.appendChild(a,b);
else{var b=document.getElementsByTagName("script")[0];b.parentNode.insertBefore(a,b)}}();
</script>
- Universal tags should always be added to your site so that they are activated for all visitors (hardcoded).
- Universal Tags will create a first party tracking cookie on the advertiser’s domain. This cookie will be populated via a value passed as a parameter (sskey) on the QueryString. * If you redirect or manipulate the landing page URL in any way you must ensure the sskey parameter and value pair are also passed. For example: https://www.advertiser-website.com/?sskey={sskey}
- If you do not implement Universal Tracking, sales from Apple Safari browsers may not be recorded due to Apple Intelligent Tracking Protection. For further info see ITP 2.2 & * Firefox Enhanced Tracking Protection
- The tag must be implemented as a Asynchronous script
Conversion Tag Setup
Before adding the Conversion Tag to the post-sale confirmation page of your site, please choose your site’s sector from the list below to see what data is required:
Retail Example
If you capture individual basket items as part of your checkout process, our system can be configured to pass these details to us, so we can analyse and report on this detail. Our reports can:
- Provide visibility of which individual products (or items) are being purchased within the shopping basket.
- Identify the most popular products & categories and the overall basket value, with options for more granular analysis by device type and by publisher.
The following parameters should be included in the conversion tag:
| Field | Description |
|---|---|
| APPID | A unique conversion reference such as the Order Number, this reference will be used for conversion validation purposes |
| Status | Please leave blank |
| TransactionValue | Value of the transaction |
| Action | Event taking place (E.g., Sale or Quote) |
| iID † | SKU or identifier of the item purchased † |
| iName † | Name of the item purchased † |
| iVol † | Volume of the item purchased † |
| iVal † †† | Value of the individual item purchased |
| iCategory † | Category of the item purchased † |
| iBrand † | Brand of the item purchased † |
| Shipping | Amount of shipping in the order |
| Tax | Amount of tax in the order |
| Vcode | Voucher Code |
| Channel | The Channel to which the conversion is attributed more |
| CustType | Whether the customer is new or existing more |
† If you are adding multiple values they must be separated by a pipe | If using iID, iName, iVal and iVol, all four MUST be populated, and MUST be populated if any iParameter is to be used for commission calculations. All other i fields may be empty strings, but ALL the fields which are populated must contain the same number of pipe-delimited values.
†† This is the value of an individual item. We will automatically calculate iVol x iVal.
Example Conversion tag:
<script type="text/javascript" src="https://track.omguk.com/e/ss/?APPID={SaleReference}&MID={MID}&PID={PID}&Status=&TransactionValue={TotalOrderValue}&Shipping={ShippingValue}&Tax={TaxValue}&Action={Event}&iID={SKU}&iName={ItemName)&iVol={ItemVolume}&iVal={ItemValue}&iCategory={ItemCategory}&iBrand={ItemBrand}&Vcode={VoucherCode}&Channel={Channel}&CustType={CustomerType}"></script>
<noscript><img src="https://track.omguk.com/e/si/?APPID={SaleReference}&MID={MID}&PID={PID}&Status=&TransactionValue={TotalOrderValue}&Shipping={ShippingValue}&Tax={TaxValue}&Action={Event}&iID={SKU}&iName={ItemName)&iVol={ItemVolume}&iVal={ItemValue}&iCategory={ItemCategory}&iBrand={ItemBrand}&Vcode={VoucherCode}&Channel={Channel}&CustType={CustomerType}" border="0" height="1" width="1"></noscript>
Example S2S Postback:
https://track.omguk.com/e/s/s2s/?APPID={SaleReference}&MID={MID}&PID={PID}&Status=&TransactionValue={TotalOrderValue}&Shipping={ShippingValue}&Tax={TaxValue}&Action={Event}&iID={SKU}&iName={ItemName)&iVol={ItemVolume}&iVal={ItemValue}&iCategory={ItemCategory}&iBrand={ItemBrand}&Vcode={VoucherCode}&Channel={Channel}&CustType={CustomerType}
Standard Parameters
| Value | Requirement | Instructions |
|---|---|---|
| {MID} | Mandatory | Your unique Advertiser ID, your Account Manager will provide this value |
| {PID} | Mandatory | Your unique Campaign ID, your Account Manager will provide this value |
Travel Example
The following parameters should be included in the conversion tag:
| Field | Description |
|---|---|
| APPID | A unique conversion reference such as the booking number, this reference will be used for conversion validation purposes |
| Status | Please leave blank |
| TransactionValue | Value of the transaction |
| Action | Event taking place (E.g., Sale or Quote) |
| iID † | SKU or identifier of the item purchased † |
| iName † | Name of the item purchased † |
| iVol † | Volume of the item purchased † |
| iVal † †† | Value of the individual item purchased |
| iBrand † | Brand of the item purchased † |
| iStartDate † | Start date, inception date or travel date of the item purchased † |
| iEndDate | End date or travel return date of the item purchased |
| iDuration † | Duration of the trip † |
| iOrigin † | Origin of the journey purchased (E.g., An airport code or city name) † |
| iDestination † | Destination of the journey purchased (E.g., An airport code or city for hotel bookings) † |
| iTravelClass † | Class of travel purchased † |
| iPassengerCount † | Number of passengers travelling (E.g., A:2,C:2,I:0) † |
| iVenueName † | Hotel, restaurant or venue name for a booking † |
| iCancellable † | Is the trip cancellable (E.g., Yes or No) † |
| Vcode | Voucher Code |
| Channel | The Channel to which the conversion is attributed more |
| CustType | Whether the customer is new or existing more |
| iMeta † | An object to store any additional data that does not fit in the above † |
† If you are adding multiple values they must be separated by a pipe | If using iID, iName, iVal and iVol, all four MUST be populated, and MUST be populated if any iParameter is to be used for commission calculations. All other i fields may be empty strings, but ALL the fields which are populated must contain the same number of pipe-delimited values.
†† This is the value of an individual item. We will automatically calculate iVol x iVal.
Example Conversion tag:
<script type="text/javascript" src="https://track.omguk.com/e/ss/?APPID={SaleReference}&MID={MID}&PID={PID}&Status=&TransactionValue={TotalOrderValue}&Action={Event}&iBrand={Brand}&iStartDate={StartDate}&iEndDate={EndDate}&iOrigin={Origin}&iDestination={Destination}&iTravelClass={Class}&iPassengerCount={NoOfPassengers}&iVenueName={Venue}&iCancellable={Cancellable}&Vcode={VoucherCode}&Channel={Channel}&CustType={CustomerType}&iMeta={Meta}"></script>
<noscript><img src="https://track.omguk.com/e/si/?APPID={SaleReference}&MID={MID}&PID={PID}&Status=&TransactionValue={TotalOrderValue}&Action={Event}&iBrand={Brand}&iStartDate={StartDate}&iEndDate={EndDate}&iOrigin={Origin}&iDestination={Destination}&iTravelClass={Class}&iPassengerCount={NoOfPassengers}&iVenueName={Venue}&iCancellable={Cancellable}&Vcode={VoucherCode}&Channel={Channel}&CustType={CustomerType}&iMeta={Meta}" border="0" height="1" width="1"></noscript>
Example S2S Postback:
https://track.omguk.com/e/s/s2s/?APPID={SaleReference}&MID={MID}&PID={PID}&Status=&TransactionValue={TotalOrderValue}&Action={Event}&iStartDate={StartDate}&iEndDate={EndDate}&iOrigin={Origin}&iDestination={Destination}&iTravelClass={Class}&iPassengerCount={NoOfPassengers}&iVenueName={Venue}&iCancellable={Cancellable}&Vcode={VoucherCode}&Channel={Channel}&CustType={CustomerType}&iMeta={Meta}
Standard Parameters
| Value | Requirement | Instructions |
|---|---|---|
| {MID} | Mandatory | Your unique Advertiser ID, your Account Manager will provide this value |
| {PID} | Mandatory | Your unique Campaign ID, your Account Manager will provide this value |
Insurance Example
The following parameters should be included in the conversion tag:
| Field | Description |
|---|---|
| APPID | A unique conversion reference such as the policy number or quote reference, this reference will be used for conversion validation purposes |
| Status | Please leave blank |
| TransactionValue | Value of the transaction |
| Action | Event taking place (E.g., Sale or Quote) |
| iID † | SKU or identifier of the item purchased † |
| iName † | Name of the item purchased † |
| iVol † | Volume of the item purchased † |
| iVal † †† | Value of the individual item purchased |
| iPolicytype † | Type of insurance policy purchased † |
| iPolicyValue † | Policy value † |
| iStartDate † | Start date, inception date or travel date of the item purchased † |
| iEndDate † | End date of the trip or policy † |
| iPolicySpecific † | Policy Type specific information (E.g., add-ons or animal type) † |
| iPaymentType † | Payment method used by the consumer (E.g., Monthly, Annual) † |
| Vcode | Voucher Code |
| Channel | The Channel to which the conversion is attributed more |
| iMeta † | An object to store any additional data that does not fit in the above † |
† If you are adding multiple values they must be separated by a pipe | If using iID, iName, iVal and iVol, all four MUST be populated, and MUST be populated if any iParameter is to be used for commission calculations. All other i fields may be empty strings, but ALL the fields which are populated must contain the same number of pipe-delimited values.
†† This is the value of an individual item. We will automatically calculate iVol x iVal.
Example Conversion tag:
<script type="text/javascript" src="https://track.omguk.com/e/ss/?APPID={SaleReference}&MID={MID}&PID={PID}&Status=&TransactionValue={TotalOrderValue}&Action={Event}&iStartDate={StartDate}&iEndDate={EndDate}&iPolicyType={PolicyType}&iPolicyValue={PolicyValue}&iPolicySpecific={PolicyTypeSpecific}&Vcode={VoucherCode}&Channel={Channel}&CustType={CustomerType}&iMeta={Meta}"></script>
<noscript><img src="https://track.omguk.com/e/si/?APPID={SaleReference}&MID={MID}&PID={PID}&Status=&TransactionValue={TotalOrderValue}&Action={Event}&iStartDate={StartDate}&iEndDate={EndDate}&iPolicyType={PolicyType}&iPolicyValue={PolicyValue}&iPolicySpecific={PolicyTypeSpecific}&Vcode={VoucherCode}&Channel={Channel}&CustType={CustomerType}&iMeta={Meta}" border="0" height="1" width="1"></noscript>
Example S2S Postback:
https://track.omguk.com/e/s/s2s/?APPID={SaleReference}&MID={MID}&PID={PID}&Status=&TransactionValue={TotalOrderValue}&Action={Event}&iPolicytype={PolicyType}&iPolicyValue={PolicyValue}&iStartDate={StartDate}&iEndDate={EndDate}&iPolicySpecific={PolicySpecific}&iPaymentType={PaymentType}&Vcode={VoucherCode}&Channel={Channel}&iMeta={Meta}
Entertainment Example
The following parameters should be included in the conversion tag:
| Field | Description |
|---|---|
| APPID | A unique conversion reference such as the booking number, this reference will be used for conversion validation purposes |
| Status | Please leave blank |
| TransactionValue | Value of the transaction |
| Action | Event taking place (E.g., Sale or Quote) |
| iID † | SKU or identifier of the item purchased † |
| iName † | Name of the item purchased † |
| iVol † | Volume of the item purchased † |
| iVal † †† | Value of the individual item purchased |
| iTicketCount † | Number of tickets purchased † |
| iPaymentType † | Payment method used by the consumer † |
| Vcode | Voucher Code |
| Channel | The Channel to which the conversion is attributed more |
| iMeta † | An object to store any additional data that does not fit in the above † |
† If you are adding multiple values they must be separated by a pipe | If using iID, iName, iVal and iVol, all four MUST be populated, and MUST be populated if any iParameter is to be used for commission calculations. All other i fields may be empty strings, but ALL the fields which are populated must contain the same number of pipe-delimited values.
†† This is the value of an individual item. We will automatically calculate iVol x iVal
Example Conversion tag:
<script type="text/javascript" src="https://track.omguk.com/e/ss/?APPID={SaleReference}&MID={MID}&PID={PID}&Status=&TransactionValue={TotalOrderValue}&Action={Event}&iTicketCount={TicketCount}&iPaymentType={PaymentType}&Vcode={VoucherCode}&Channel={Channel}&CustType={CustomerType}&iMeta={Meta}"></script>
<noscript><img src="https://track.omguk.com/e/si/?APPID={SaleReference}&MID={MID}&PID={PID}&Status=&TransactionValue={TotalOrderValue}&Action={Event}&iTicketCount={TicketCount}&iPaymentType={PaymentType}&Vcode={VoucherCode}&Channel={Channel}&CustType={CustomerType}&iMeta={Meta}" border="0" height="1" width="1"></noscript>
Example S2S Postback:
https://track.omguk.com/e/s/s2s/?APPID={SaleReference}&MID={MID}&PID={PID}&Status=&TransactionValue={TotalOrderValue}&Action={Event}&iTicketCount={TicketCount}&iPaymentType={PaymentType}&Vcode={VoucherCode}&Channel={Channel}&CustType={CustomerType}&iMeta={Meta}
Standard Parameters
| Value | Requirement | Instructions |
|---|---|---|
| {MID} | Mandatory | Your unique Advertiser ID, your Account Manager will provide this value |
| {PID} | Mandatory | Your unique Campaign ID, your Account Manager will provide this value |
Finance Example
The following parameters should be included in the conversion tag:
| Field | Description |
|---|---|
| APPID | A unique conversion reference such as the unique application number, this reference will be used for conversion validation purposes |
| Status | Please leave blank |
| TransactionValue | Value of the transaction |
| Action | Event taking place (E.g., Sale or Quote) |
| iID † | SKU or identifier of the item purchased † |
| iName † | Name of the item purchased † |
| iVol † | Volume of the item purchased † |
| iVal † †† | Value of the individual item purchased |
| iPurpose † | Purpose of the loan † |
| iDuration † | Duration of a loan † |
| Channel | The Channel to which the conversion is attributed more |
| iMeta † | An object to store any additional data that does not fit in the above † |
† If you are adding multiple values they must be separated by a pipe | If using iID, iName, iVal and iVol, all four MUST be populated, and MUST be populated if any iParameter is to be used for commission calculations. All other i fields may be empty strings, but ALL the fields which are populated must contain the same number of pipe-delimited values.
†† This is the value of an individual item. We will automatically calculate iVol x iVal.
Example Conversion tag:
<script type="text/javascript" src="https://track.omguk.com/e/ss/?APPID={SaleReference}&MID={MID}&PID={PID}&Status=&TransactionValue={TotalOrderValue}&Action={Event}&iPurpose={PurposeOfLoan}&iDuration={DurationOfLoan}&Vcode={VoucherCode}&Channel={Channel}&iMeta={Meta}"></script>
<noscript><img src="https://track.omguk.com/e/si/?APPID={SaleReference}&MID={MID}&PID={PID}&Status=&TransactionValue={TotalOrderValue}&Action={Event}&iPurpose={PurposeOfLoan}&iDuration={DurationOfLoan}&Vcode={VoucherCode}&Channel={Channel}&iMeta={Meta}" border="0" height="1" width="1"></noscript>
https://track.omguk.com/e/s/s2s/?APPID={SaleReference}&MID={MID}&PID={PID}&Status=&TransactionValue={TotalOrderValue}&Action={Event}&iPurpose={PurposeOfLoan}&iDuration={DurationOfLoan}&Vcode={VoucherCode}&Channel={Channel}&iMeta={Meta}
Standard Parameters
| Value | Requirement | Instructions |
|---|---|---|
| {MID} | Mandatory | Your unique Advertiser ID, your Account Manager will provide this value |
| {PID} | Mandatory | Your unique Campaign ID, your Account Manager will provide this value |
Energy Example
The following parameters should be included in the conversion tag:
| Field | Description |
|---|---|
| APPID | A unique conversion reference such as the policy number or quote reference, this reference will be used for conversion validation purposes |
| Status | Please leave blank |
| TransactionValue | Value of the transaction |
| Action | Event taking place (E.g., Sale or Quote) |
| iID † | SKU or identifier of the item purchased † |
| iName † | Name of the item purchased † |
| iVol † | Volume of the item purchased † |
| iVal † †† | Value of the individual item purchased |
| iDuration † | Length of plan that customer has switched to † |
| iCat † | Dual or Single Fuel Switch † |
| CustType | Customer Type - "new" or "existing" more |
| iStartDate | Start date, inception date of the deal purchased |
| iEndDate | End date of the deal purchased |
| iPaymentType † | Payment method used by the consumer (E.g., Monthly, Annual) † |
| Channel | The Channel to which the conversion is attributed more |
| iMeta † | An object to store any additional data that does not fit in the above † |
† If you are adding multiple values they must be separated by a pipe | If using iID, iName, iVal and iVol, all four MUST be populated, and MUST be populated if any iParameter is to be used for commission calculations. All other i fields may be empty strings, but ALL the fields which are populated must contain the same number of pipe-delimited values.
†† This is the value of an individual item. We will automatically calculate iVol x iVal.
Example Conversion tag:
<script type="text/javascript" src="https://track.omguk.com/e/ss/?APPID={SaleReference}&MID={MID}&PID={PID}&Status=&TransactionValue={TotalOrderValue}&Action={Event}&iDuration={Duration}&iCat={DualORSingle}&CustType={CustomerType}&iStartDate={StartDate}&iEndDate={EndDate}&iPaymentType={PaymentType}&Channel={Channel}&iMeta{Meta}"></script>
<noscript><img src="https://track.omguk.com/e/si/?APPID={SaleReference}&MID={MID}&PID={PID}&Status=&TransactionValue={TotalOrderValue}&Action={Event}&iDuration={Duration}&iCat={DualORSingle}&CustType={CustomerType}&iStartDate={StartDate}&iEndDate={EndDate}&iPaymentType={PaymentType}&Channel={Channel}&iMeta={Meta}" border="0" height="1" width="1"></noscript>
Example S2S Postback:
https://track.omguk.com/e/s/s2s/?APPID={SaleReference}&MID={MID}&PID={PID}&Status=&TransactionValue={TotalOrderValue}&Action={Event}&iDuration={Duration}&iCat={DualORSingle}&CustType={CustomerType}&iStartDate={StartDate}&iEndDate={EndDate}&iPaymentType={PaymentType}&Channel={Channel}&iMeta={Meta}
Standard Parameters
| Value | Requirement | Instructions |
|---|---|---|
| {MID} | Mandatory | Your unique Advertiser ID, your Account Manager will provide this value |
| {PID} | Mandatory | Your unique Campaign ID, your Account Manager will provide this value |
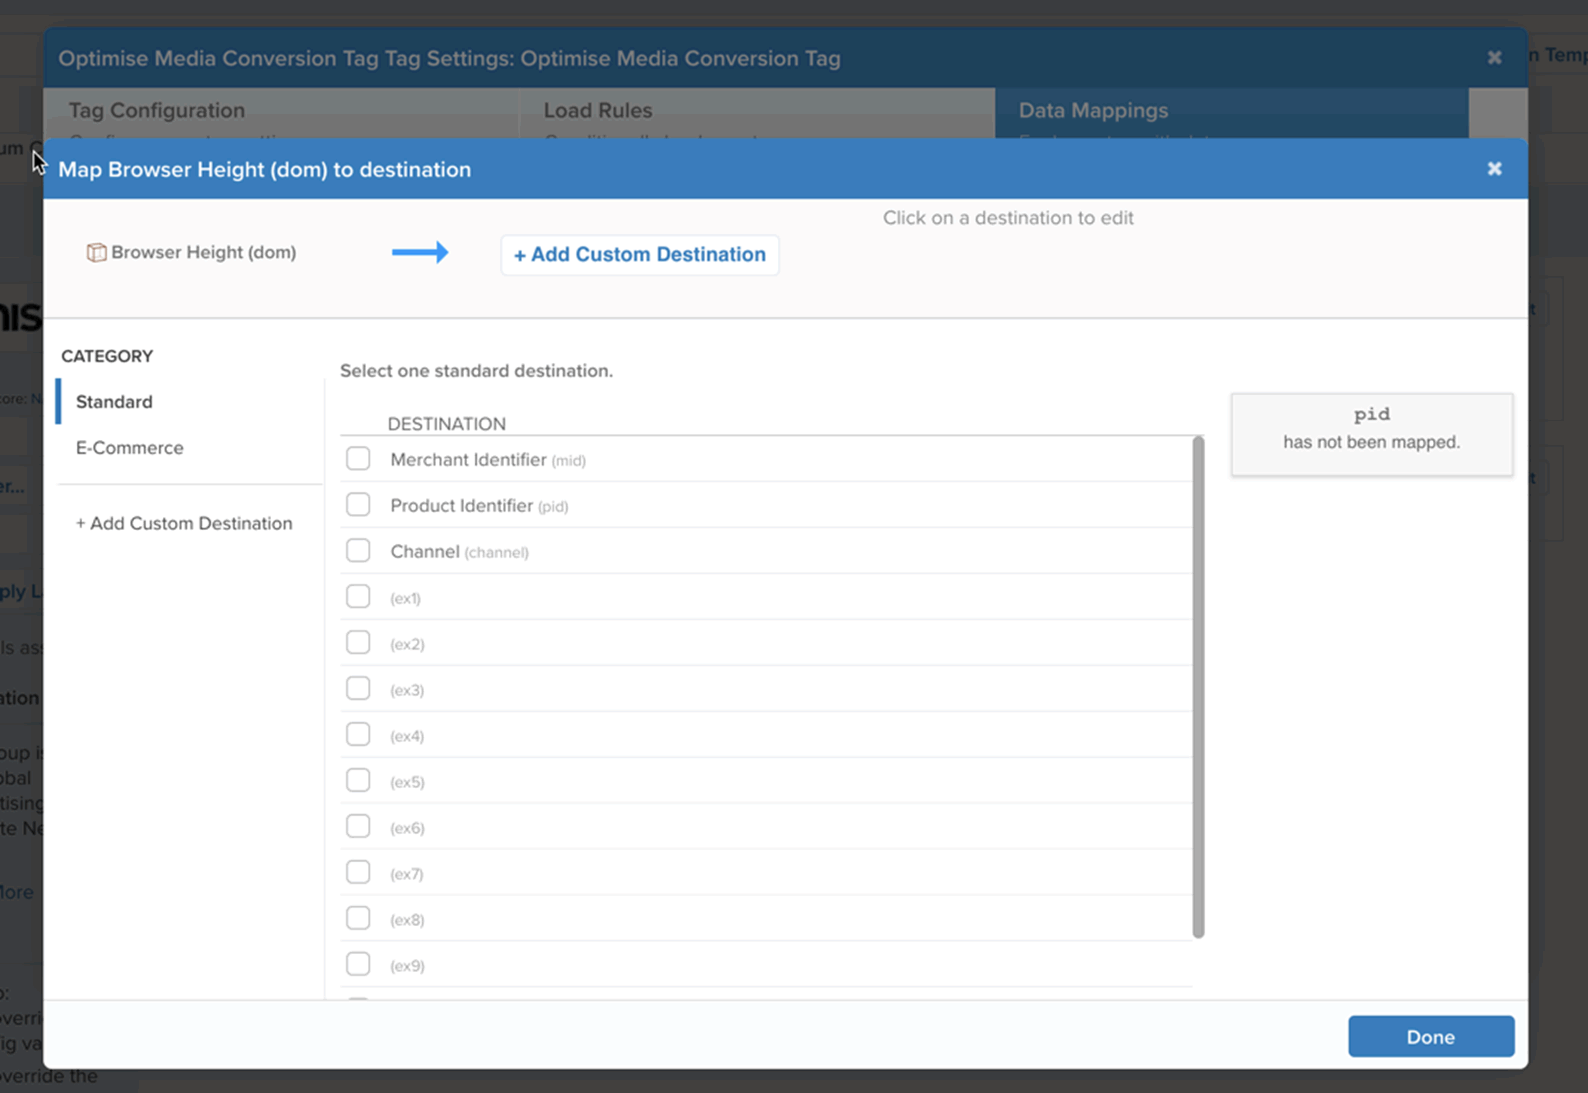
Integration Templates
Our Universal Tracking is ready to integrate with a number of 3rd party tracking and e-commerce platforms.
Also see Conversion Tag Setup to see what data should be added to your conversion tags.
Please read our latest guidance on Browser Privacy Controls and ensure your 3rd party solution will mitigate these impacts.
Google Tag Manager
Optimise Tracking tags can easily be added to Google Tag Manager.
This article assumes you have a basic understanding of Data Layer variables, and is only for track.omguk.com, not track.in.omgpm.com (India).
There are two steps to adding Optimise Tracking to Google Tag Manager:
- Add the Universal Tag to all pages.
- Add the Conversion Tag to post conversion confirmation page.
Login to your Google Tag Manager account and follow the steps below:
Adding the Universal Tag
- On the left navigation pane, selecting ‘Tags’ then ‘New’.
- Name the tag, and click the ‘Tab Configuration’ box.
- Select ‘Discover more tag types in the Community Template Gallery’.
- Search for ‘Optimise’ in the top right search bar; in this example we will be using the Optimise Conversion Universal Tag.
- Select ‘Add to workspace’.
- Check all permissions and confirm adding the community template to the workspace by selecting ‘Add’.
- Fill in the details provided by your Account Manager, then click ‘Save’. For more information please see the parameter descriptions.
- Select ‘Add trigger'.
- When choosing a Trigger, we suggest ‘All Pages’ for the Universal Tag.
- Once the Trigger has been selected, click ‘Save’.
- Select Submit if you are happy with the new tag and trigger setup configuration.
- Give the newly created tag/trigger a version name, and an easy to distinguish description.
Adding the Sale/Transaction Tag
On the left navigation pane, selecting ‘Tags’ then ‘New’.
Name the tag, and click the ‘Tab Configuration’ box.
Select ‘Discover more tag types in the Community Template Gallery’.
Search for ‘optimise’ in the top right search bar; in this example we will be using the Optimise Conversion Tag.
Select ‘Add to workspace’.
Confirm adding the community template to the workspace by selecting ‘Add’.
Fill in the details provided by your Account Manager, then click ‘Save’.
Select ‘Add trigger’.
Click the ‘+’ symbol at the top right.
Name the new trigger - for example, Thankyou page. Then select ‘Choose a Trigger Type to begin set-up’.
Select ‘Window Loaded’ when choosing a trigger type.
To configure a new trigger:
- Select ‘Some Window Loaded Events’ for the trigger fire rule radio button.
- Select Page Path.
- Select fire on some pages, then put the rule on the last step.
- When ready, click on 'Save' to save the trigger.
Select ‘Save’.
Select ‘Submit’.
Choose a Version Name, and Version description then select ‘Publish’.
Adding data layer variable
- To understand more about the Data Layer, please see https://developers.google.com/tag-manager/devguide#datalayer.
- Add the following JavaScript to your page just above your Google Tag Manager JavaScript replacing the values as appropriate:
<script>dataLayer =[{'SaleReference':'ORD-000023','SaleValue':'12.99','VoucherCode':'VOUCHER1234'}];</script>"
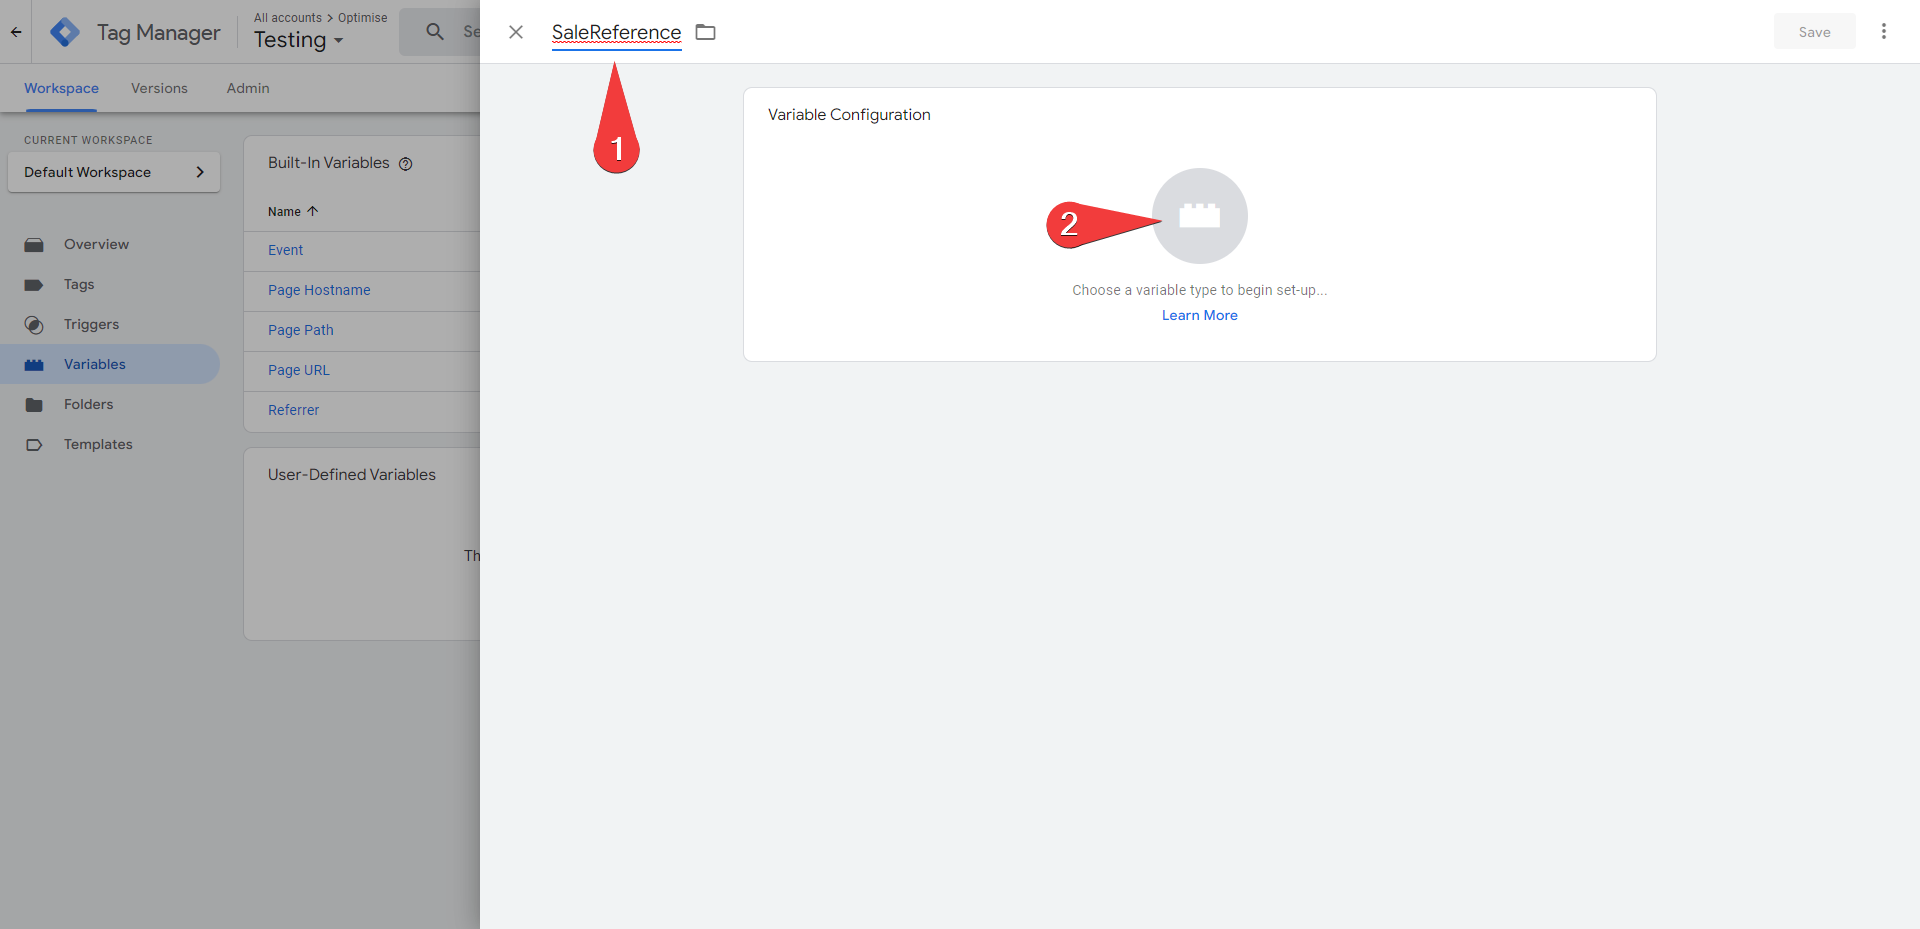
You should then create the variables from the Data Layer within Google Tag Manager, so they are accessible by heading to the Variables tab on the left hand side:
i.
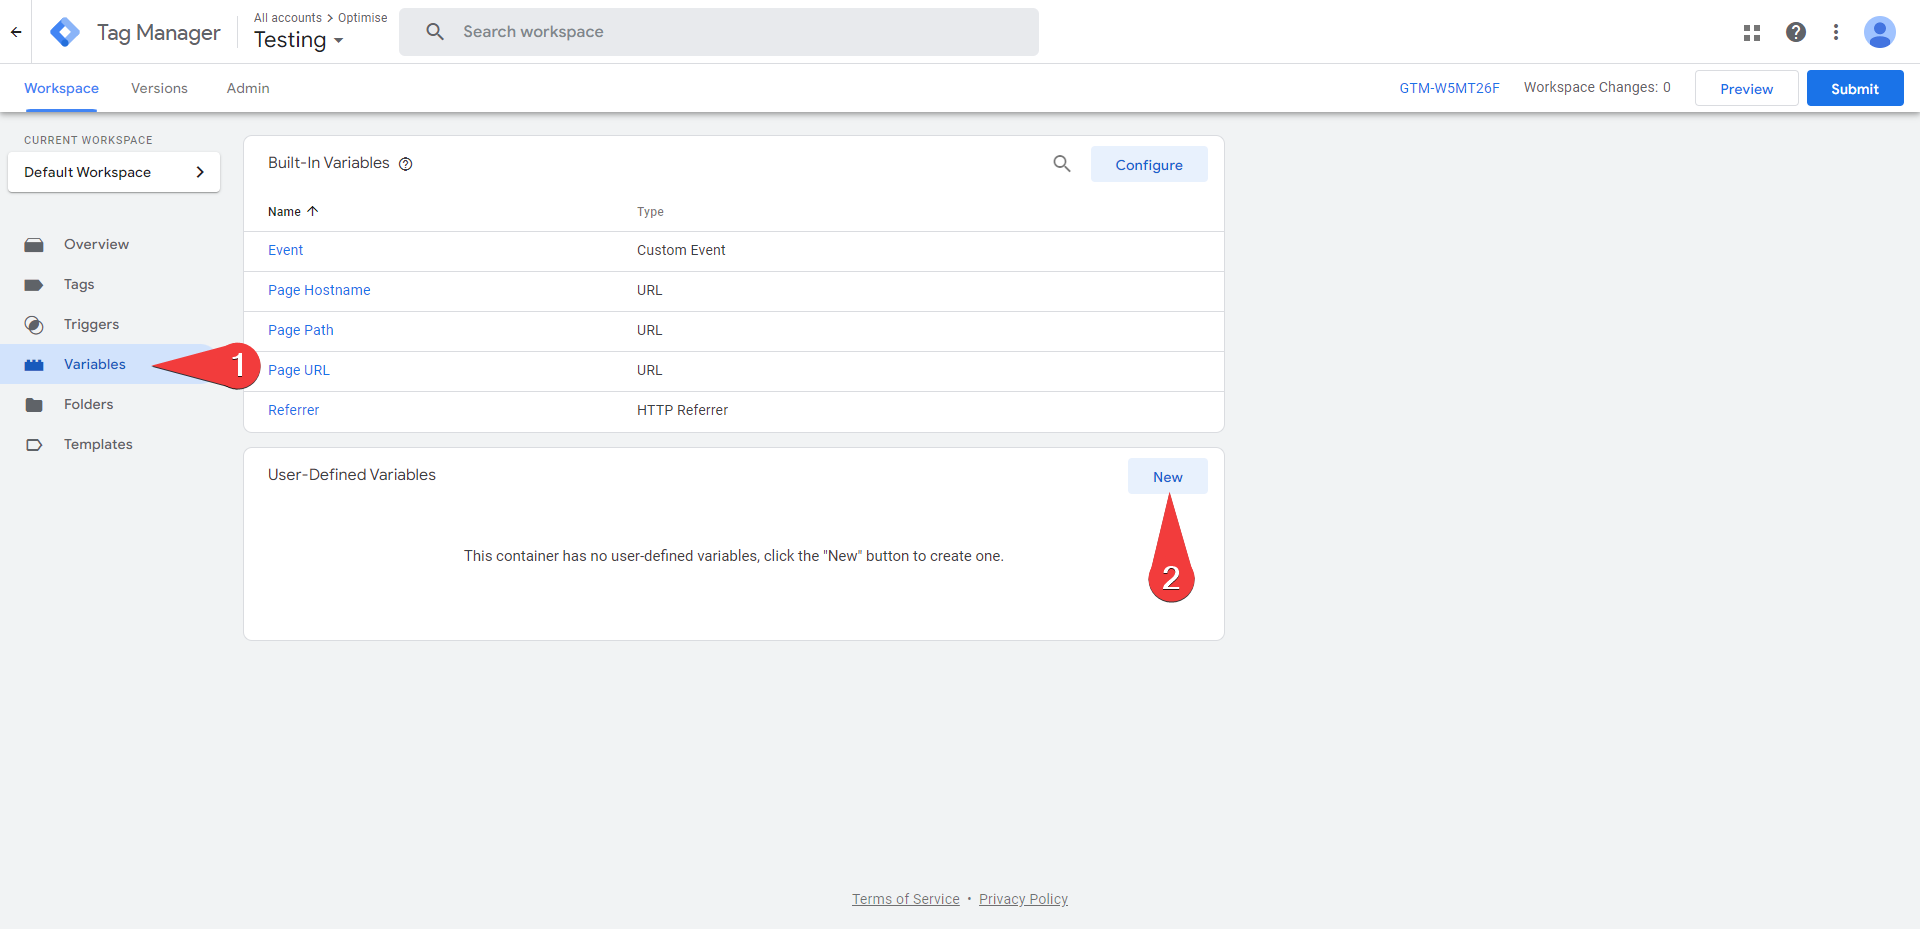
ii.
iii.
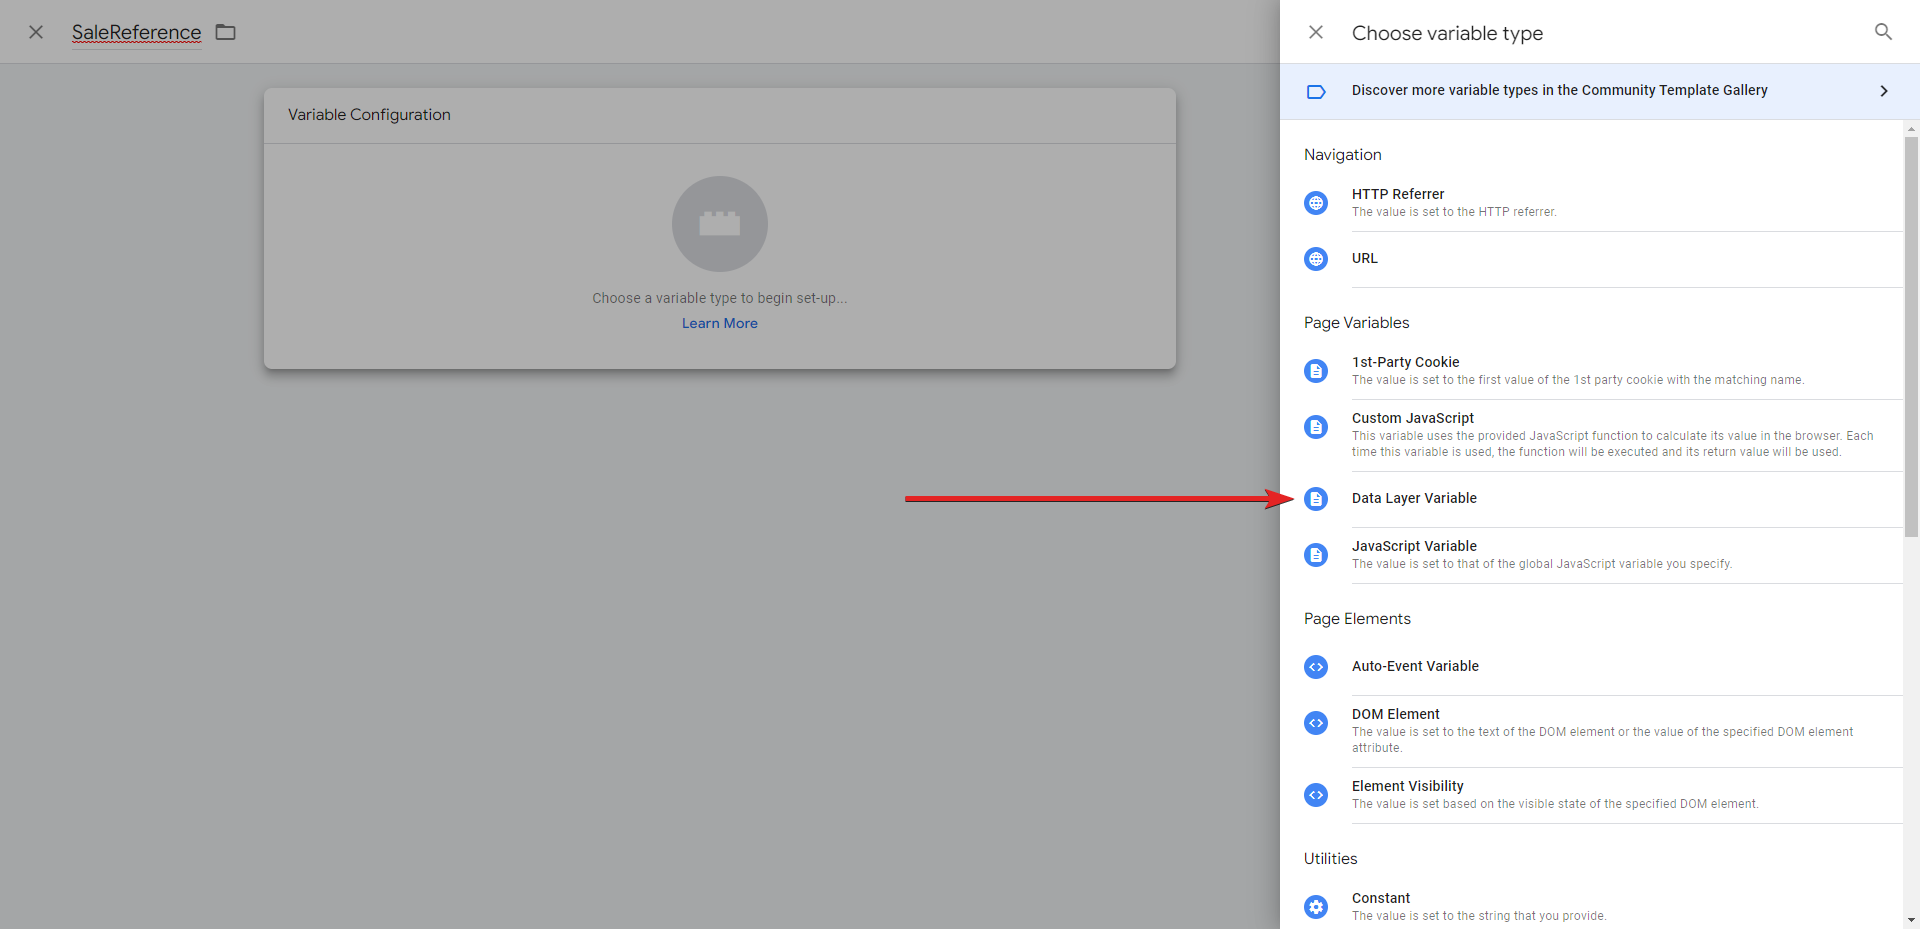
Once the variable has been created you can reference it in your Tags through a macro format like: {{SaleReference}}:
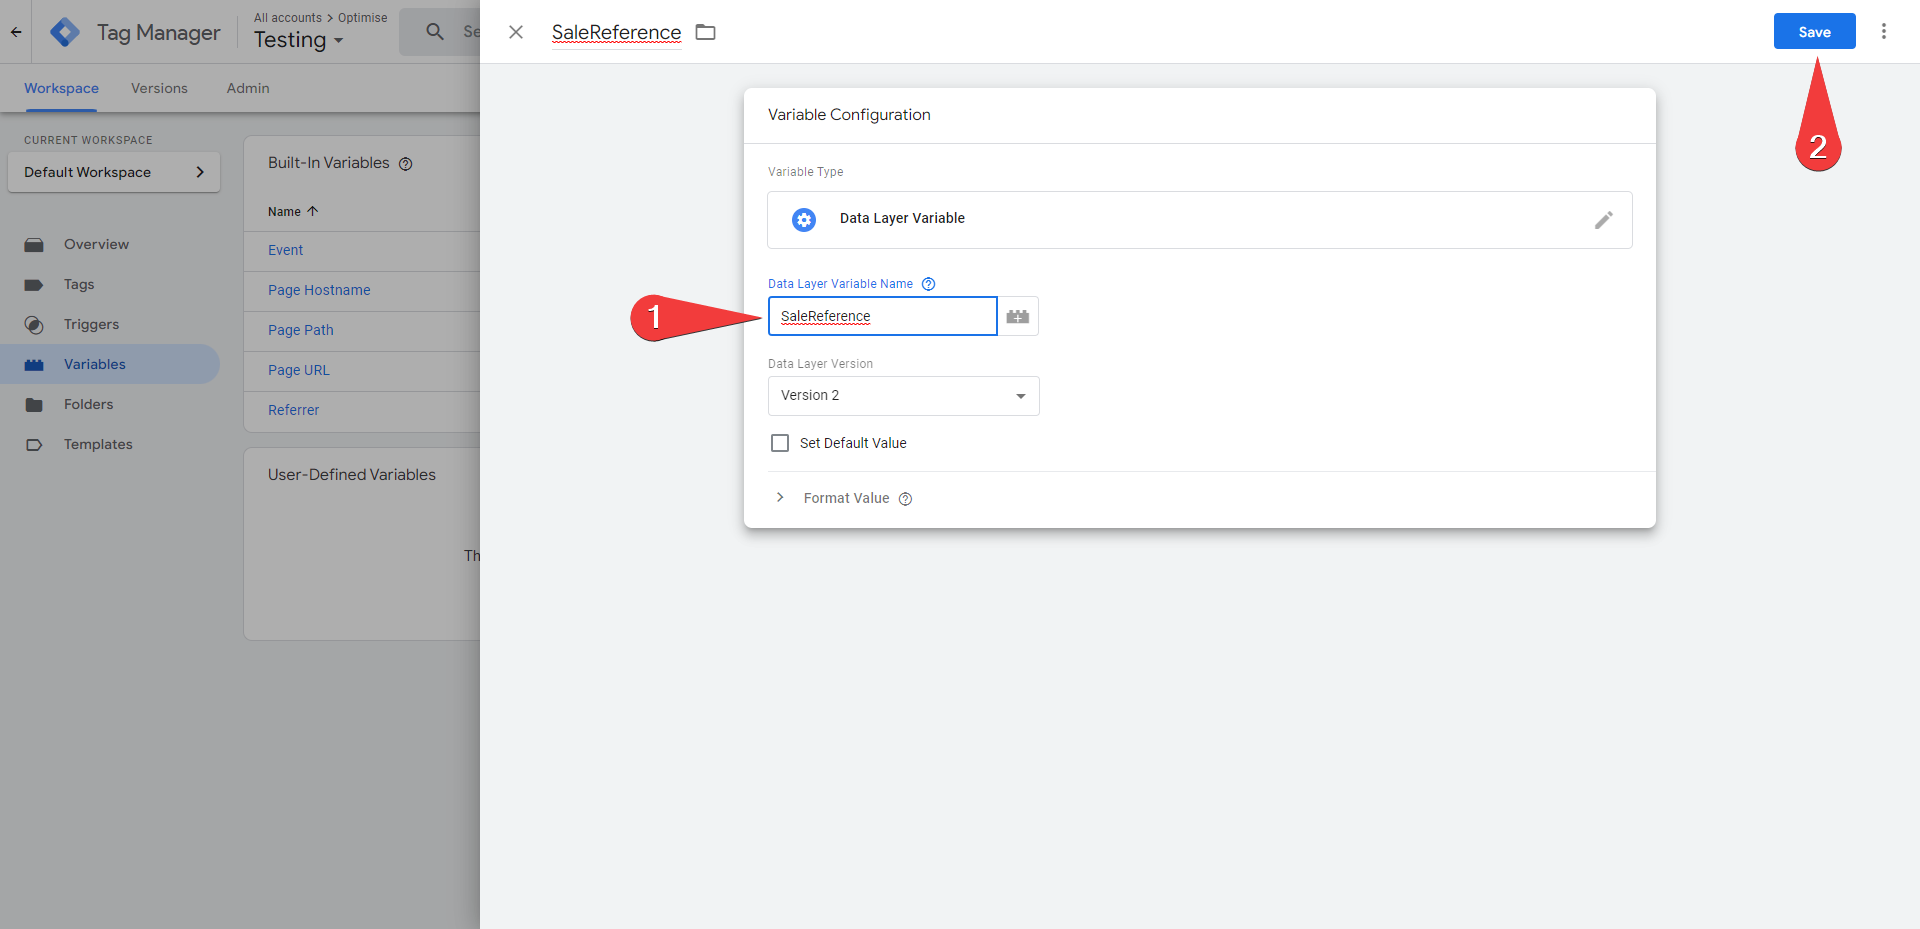
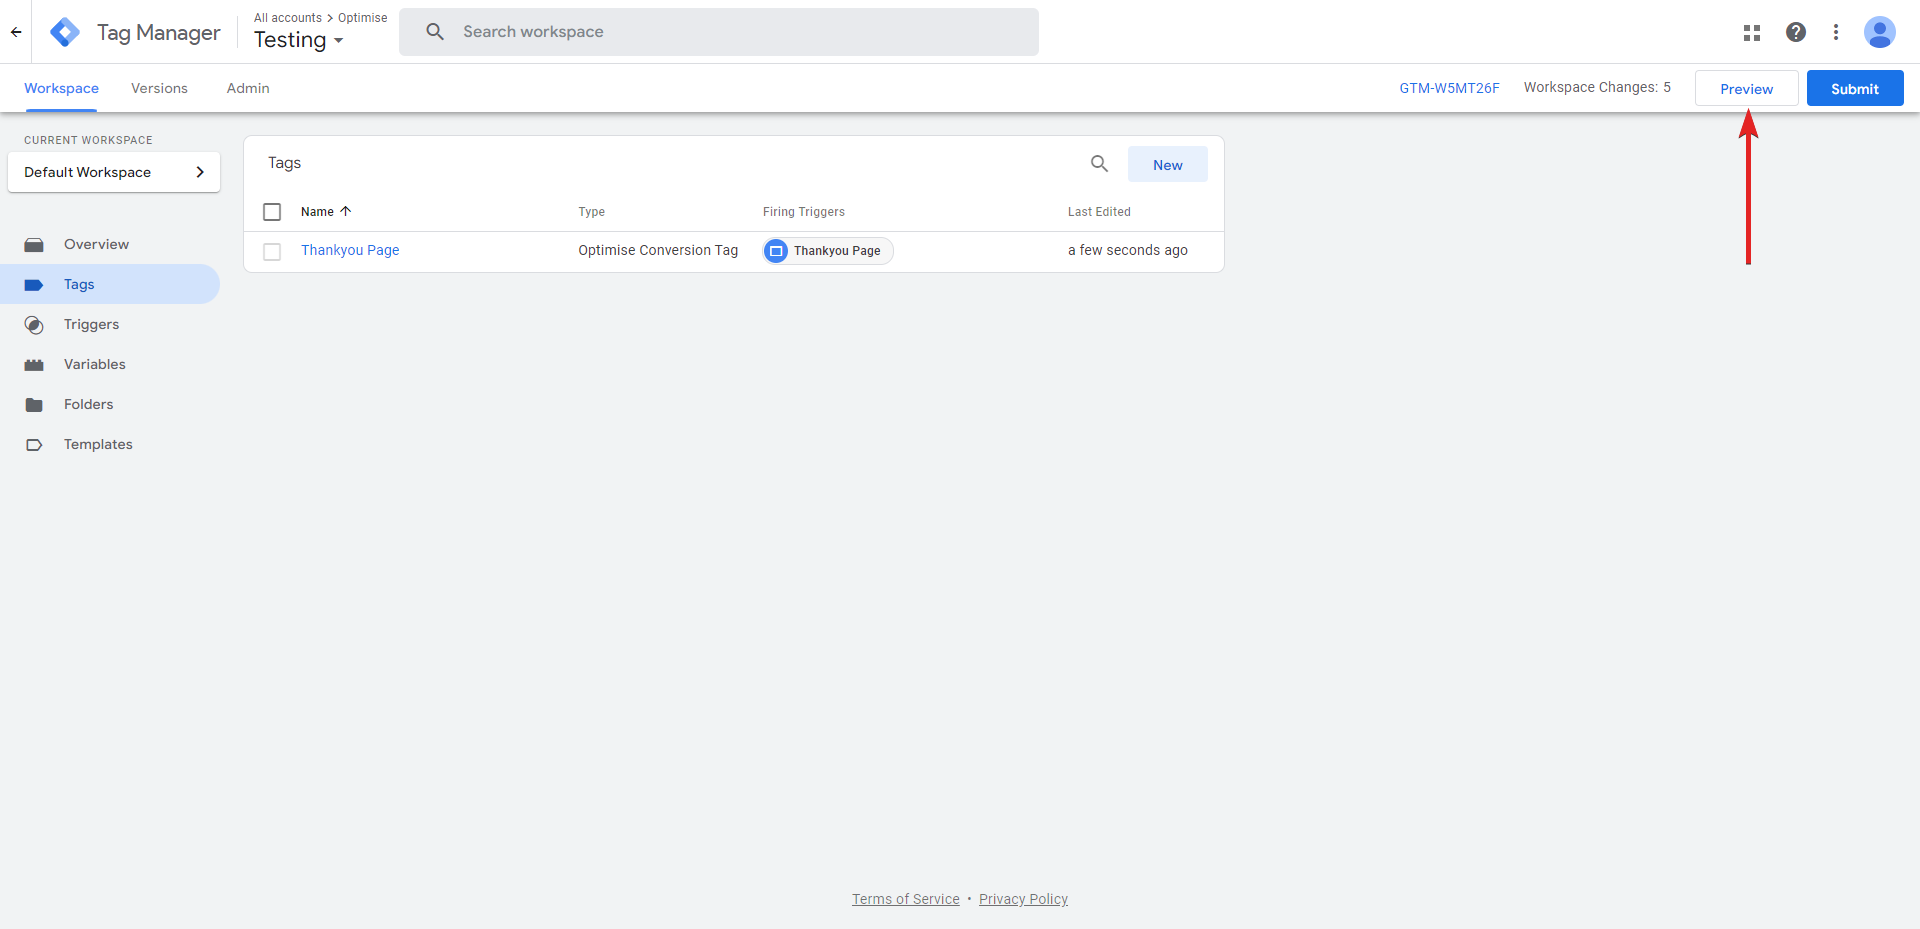
You can then Preview your tags, triggers and variables by using the 'Preview' button at the top right of the 'Tags' screen:
Adding the tag manually
Click on Tags > New.
Add a name for your tag and select 'Tab Configuration', creating a new tag.
Select 'Custom HTML'.
- Copy and paste in tag provided to you by your Account Manager. i. You will need to replace the current placeholders with the associated DataLayer Variable names you have created in Google Tag Manager. Eg., AppID={{SaleReference}} and Status={{SaleValue}}. ii. Select Triggering once complete.
The tag provided by your Account Manager must be used.
If GTM tags are being used to host affiliate JS tags, it may be necessary to enable document.write in GTM.
Select the '+'' symbol at the top right to create a new trigger.
Name the Trigger and continue to Trigger configuration.
Select 'Window Loaded'.
You will then need to choose the variable which fires the tag. If you have not already created a variable then we recommend creating a First Party Cookie variable named 'SaleAttribution' (see example below):

Choose 'Save', then either save again or Preview your changes.
Adding Data Layer Variables
To understand more about the Data Layer Click here.
- Add the following JavaScript to your page just above your Google Tag Manager JavaScript replacing the values as appropriate:
<script>
dataLayer =[{
'SaleReference':'ORD-000023',
'SaleValue':'12.99',
'VoucherCode':'VOUCHER1234'
}];
</script>
You should then create the variables from the Data Layer within Google Tag Manager so they are accessible.
Once the variable has been created you can reference it in your Tags through a macro format like: {{SaleReference}}
Shopify
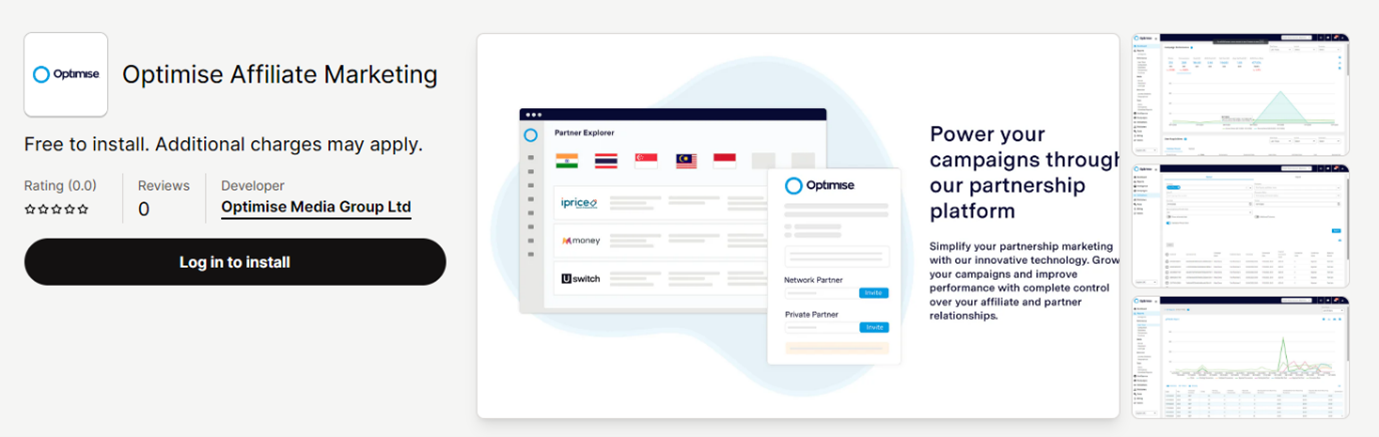
The Optimise Shopify App allows for quick integration of Universal Tracking for advertisers who have a Shopify store. It also automates the tracking via the Shopify API. The app is listed in the Shopify App Store at the following URL: https://apps.shopify.com/optimise-affiliate-marketing
Installing the Shopify app
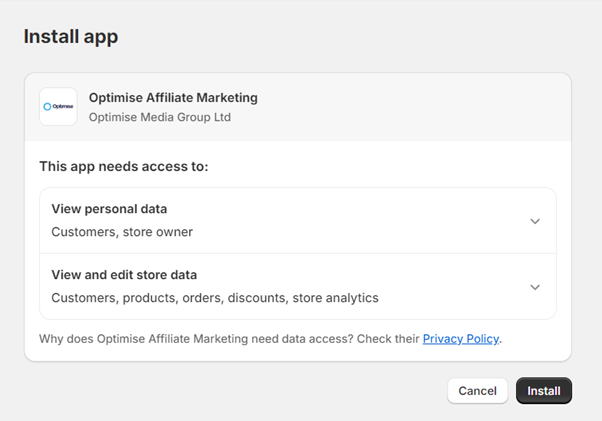
To install the app, please head to the Optimise Affiliate Marketing Shopify link above, then click install:
After redirecting to the Shopify apps page in the store, accept the prompt to install the app:
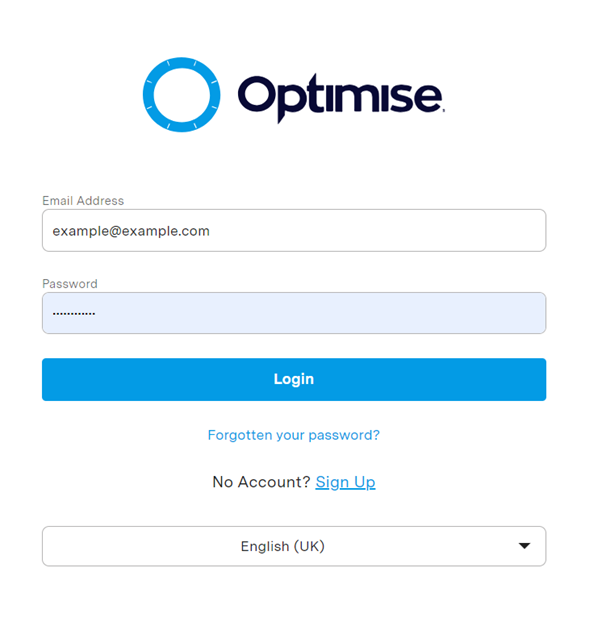
After clicking install, please login to the Insights using your log-in using credentials. If not yet registered, select the 'Sign-Up' link.
An account is required to proceed with installing Shopify.
From here, please select a campaign to associate the Shopify app with. This campaign will then be where tracking link for publishers will be displayed.
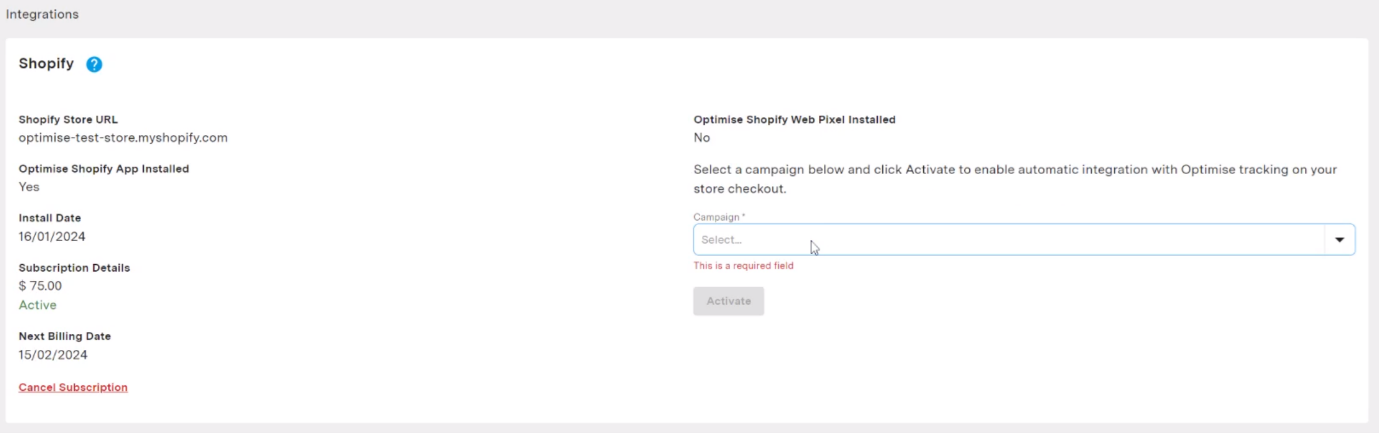
Validations process
Once installed, and campaign tracking is setup, any orders subsequently placed via the tracking links will be linked back to this campaign. The validation set-up will still need to be set up on the campaign details as per all campaigns in Insights.
The validation process for Shopify campaigns will follow the normal validations rules, however a limitation with Shopify is that we can only retrieve order information from the last 12 weeks. This means that the validations period must be set to Begin after 2 months and End in a maximum of 3 months.
If an order is cancelled/refunded within the validation window set, we automatically receive this information from Shopify which will mark that conversion as rejected.
If just one item from an order if refunded the conversion value will be amended for that transaction but will remain pending approval, unless the entire order is subsequently cancelled/refunded.
Invoicing
For all invoicing, this will follow the usual Optimise invoicing process.
Product Feeds
After installing the Shopify app, your Shopify product inventory feed will automatically be imported into the Product Feeds section under Tools - https://dashboard.optimisemedia.com/advertiser/product-feeds. This will then be updated on a daily basis automatically.
Voucher Codes
These can be imported from voucher codes created in Shopify. You can specify whether they want to import all of the vouchers created in their Shopify store, or specific codes starting with a certain prefix - such as AFF etc. Multiple prefixes can be specified.
To import vouchers, a please click the 'Import Vouchers' button on the integrations card for Shopify.
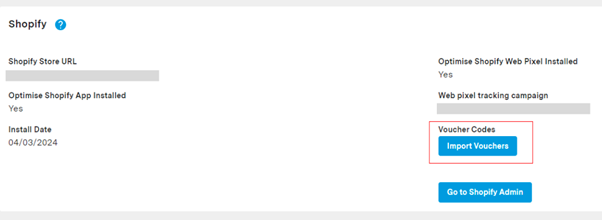
A pop-up will then appear where a user can click 'Import All', or specify which prefixes for vouchers they want to import.

Uninstalling the App
If at any point you want to remove Shopify from your account, after uninstalling all permissions will be revoked and session details will be removed from our database. Your account will remain active on Insights, but all information pertaining to Shopify will cease.
If there any outstanding validations, these will then need to be completed manually.
Squarespace
To integrate with Squarespace, follow the steps outlined below. After completing the integration, perform a test transaction to verify the tracking setup.
Please note, either a Business or Commerce account is required use Squarespace's Code Injection feature.
How to access the Code Injection Settings in Squarespace:
- From the Home Menu, navigate to Settings, then click on Advanced, and select Code Injection.
Universal Tag
- Locate the Footer section on each page along the user journey and paste the following code into the provided box:
<script type="text/javascript">
    OMID = {YOURMID};
    OPID = {YOURPID};
    ORef = escape(window.parent.location.href);
    !function() {
        var a = document.createElement("script");
        a.type = "text/javascript";
        a.async = true;
        a.src = "//track.omguk.com/e/qs/?action=Content&MID=" + OMID + "&PID=" + OPID + "&ref=" + ORef;
        var b = document.getElementsByTagName("body")[0];
        if (b) b.appendChild(a, b);
        else {
            var b = document.getElementsByTagName("script")[0];
            b.parentNode.insertBefore(a, b);
        }
    }();
</script>
- Substitute {YOURMID} with your Advertiser ID.
- Substitute {YOURPID} with the PID associated with this campaign.
Conversion Tag
- Locate the Order Confirmation Page section and paste the following code into the provided box:
<script type='text/javascript' src="https://track.omguk.com/{YOURMID}/e/ss/?APPID={OrderID}&MID={YOURMID}&PID={YOURPID}&Status=&Action=Sale&TransactionValue={TotalOrderValue}">
</script>
<noscript>
    <img border="0" height="1" width="1" src="https://track.omguk.com/e/si/?APPID={OrderID}&MID={YOURMID}&PID={YOURPID}&Status=&Action=Sale&TransactionValue={TotalOrderValue}">
</noscript>
Replace Placeholders with Your Information:
- Substitute {YOURMID} with your Advertiser ID.
- Substitute {YOURPID} with the PID associated with this campaign.
WooCommerce
For clients using WordPress & WooCommerce we recommend using the PRO Version of the Tracking Code Manager plugin. Once installed use the following tracking tag template. The tracking achieved here is only basic and doesn’t utilise Item/Basket or Voucher Code Tracking.
Further instructions here: https://support.intellywp.com/article/22-add-conversion-pixels-to-your-woocommerce-thank-you-page
or here: https://docs.deltaprojects.com/tracking/wordpress.html
<script type='text/javascript' src="https://track.omguk.com/e/ss/?APPID=@@ORDERID@@&MID=###MID###&PID=###PID###&Status=&TransactionValue=@@TOTAL@@&Cur=@@CURRENCY@@&Channel=Optimise"></script>
<noscript><img src="https://track.omguk.com/e/si/?APPID=@@ORDERID@@&MID=###MID###&PID=###PID###&Status=&TransactionValue=@@TOTAL@@&Cur=@@CURRENCY@@&Channel=Optimise" border="0" height="1" width="1"></noscript>
If you are using any custom thank you pages, this may prevent the macros for @@OrderID@@, @@Total@@ and @@Currency@@ from functioning correctly
Magento
For clients using Magento we recommend following the instructions below. This integration guide applies to Magento 1.x.
Conversion Tag
Add the Conversion Tag to the Checkout Success page and include the relevant data items.
Locate the checkout success page at:
/var/www/html/magento/app/design/frontend/base/default/template/checkout/success.phtml
You will need to insert the following code blocks into the page.
First add the PHP block:
<?php
$lastOrderId = Mage::getSingleton('checkout/session')->getLastOrderId();

$order = Mage::getModel('sales/order')->load($lastOrderId);
$basket = $order->getAllItems();

$allData = $order->getData();
$orderValue = $_totalData['grand_total'];
$shippingvalue = $_totalData['shipping_amount'];
$voucherCode = $_totalData['coupon_code'];
$currency = Mage::app()->getStore()->getCurrentCurrencyCode();
?>
Then add this JavaScript block immediately below it:
<script type='text/javascript' src="https://track.omguk.com/e/ss/?APPID=<?php echo $lastOrderId; ?>&MID=###MID###&PID=###PID###&Status=&TransactionValue=<?php echo $orderValue; ?>&Cur=<?php echo $currency; ?>&Channel=Optimise&Vcode=<?php echo $voucherCode; ?>"></script>
<noscript><img src="https://track.omguk.com/e/si/?APPID=<?php echo $lastOrderId; ?>&MID=###MID###&PID=###PID###&Status=&TransactionValue=<?php echo $orderValue; ?>&Cur=<?php echo $currency; ?>&Channel=Optimise&Vcode=<?php echo $voucherCode; ?>" border="0" height="1" width="1"></noscript>
Ensure you replace ###MID### and ###PID### with the values supplied to you.
Universal Tag
To include the Universal Tag on every page locate:
/app/design/frontend/[your package]/[your theme]/template/catalog/product/view.phtml
And enter the following code:
<script type="text/javascript">
OMID=###MID###;OPID=###PID###;ORef=escape(window.parent.location.href);
!function(){var a=document.createElement("script");a.type="text/javascript",a.async=!0,
a.src="//track.omguk.com/e/qs/?action=Content&MID=" + OMID + "&PID=" + OPID + "&ref="+ ORef;
var b=document.getElementsByTagName("body")[0];if(b)b.appendChild(a,b);
else{var b=document.getElementsByTagName("script")[0];b.parentNode.insertBefore(a,b)}}();
</script>
Ensure you replace ###MID### and ###PID### with the values supplied to you.
DoubleClick Floodlight
Basic Template
JavaScript tag (preferred):
<script type='text/javascript' src="https://track.omguk.com/e/ss/?Status=&MID=XXXX&PID=XXXX&APPID=%pord=!;&TransactionValue=%pcost=!?"></script><noscript><img src="https://track.omguk.com/e/si/?Status=&MID=XXXX&PID=XXXX&APPID=%pord=!;&TransactionValue=%pcost=!?" border="0" height="1" width="1"></noscript>
Pixel:
<img src="https://track.omguk.com/e/si/?Status=%pcost=!;&MID=XXXX&PID=XXXX&APPID=%pord=!?" border="0" height="1" width="1">
Note: We recommend configuring the tag in Default mode. See Publisher mode vs Default mode below
Template for Extended Data
JavaScript tag (preferred):
<script type='text/javascript' src="https://track.omguk.com/e/ss/?MID=XXXX&PID=XXXX&Status=&TransactionValue=%pcost=!;&Ex1=%pu12=!;&APPID=%pord=!?"></script><noscript><img src="https://track.omguk.com/e/si/?MID=XXXX&PID=XXXX&Status=&TransactionValue=%pcost=!;&Ex1=%pu12=!;&APPID=%pord=!?" border="0" height="1" width="1"></noscript>
Pixel:
<img
  src="https://track.omguk.com/e/si/?MID=XXXX&PID=XXXX&Status=&TransactionValue=%pcost=!;&Ex1=%pu12=!;&APPID=%pord=!?"
  border="0"
  height="1"
  width="1"
/>
- DoubleClick Macros start with a %p and finish with a =!; For example:
- The last Macro must with finish with a =!? (otherwise all parameters will be appended to the end of the string)
Floodlight Example
Example of a Doubleclick Floodlight tag on Advertiser confirmation page:
<iframe
  src="https://5737208.fls.doubleclick.net/activityi;src=5737208;type=thank0;cat=reser0;qty=1;cost=%JS_TotalCostWithTax%;u1=%JS_ArrivalDtYYYYMMDD%;u2=%JS_DepartDtYYYYMMDD%;u3=%JS_NightsQty%;u4=%JS_CCountry%;u5=%JS_GuestQty%;u6=%JS_ChildQty%;u7=%JS_RmQty%;u8=%JS_RoomName%;u9=%JS_TotalCost%;u10=%JS_CurrCode%;u11=%JS_RateName%;u12=%JS_HName%;u13=%JS_LangCode%;dc_lat=;dc_rdid=;tag_for_child_directed_treatment=;ord=%JS_ConfirmNo%?"
  width="1"
  height="1"
  frameborder="0"
  style="display:none"
></iframe>
u parameters can be used to populate EX & Item values.
Implementation
- If you utilise DoubleClick within Google Tag Manager you can take advantage of the Conversion Linker tag to mitigate the impacts of Apple ITP 2.0
- If the Optimise tag is not being fired by the DoubleClick tag, check that the DoubleClick tag has not been implemented as a pixel - it must be added as an iframe for it to be able to load our tag
Publisher mode vs Default mode
- Publisher mode – in this mode our tag is only fired for our affiliate activity (so the Floodlight tag looks for the cookie DoubleClick from the last click and if it determines it to be from one of our affiliates (as we have redirected the user via E.g., https://ad.doubleclick.net/ddm/clk/402032186;202198621;s) then our tag is fired.
- Default mode – our tag is fired for every application, however our tag retrieves our affiliate Id from our own cookie, so we will only track sales where our cookie is found. Although this means there is a chance of cross – channel duplication (E.g., in the event that the user has clicked on of our affiliates’ links and then returned via another network or marketing channel) , we do have a monthly validation process where we send all tracked sales for you to approve or reject, so any duplicated sales that have been attributed to another channel can be rejected then. Alternatively, our tag has a ‘channel’ parameter that can be used to pass a last referring channel identifier into our tag. If you can configure the Floodlight tag to pass this onto our tag, we can then configure our tracking to ignore any sales where we aren’t the last referring channel.
DoubleClick help article on Floodlight variables
https://support.google.com/dfa/partner/answer/1094276?hl=en See note re Google Tag Manager: End your string with a semi-colon, not a question mark.
DoubleClick click trackers
Example: http://ad.doubleclick.net/clk;263036570;88365486;t
Further info about Click tracker tags: http://support.google.com/dfa/partner/answer/188812?hl=en&ref_topic=2619210
Testing a floodlight tag (Google articles)
Ensighten
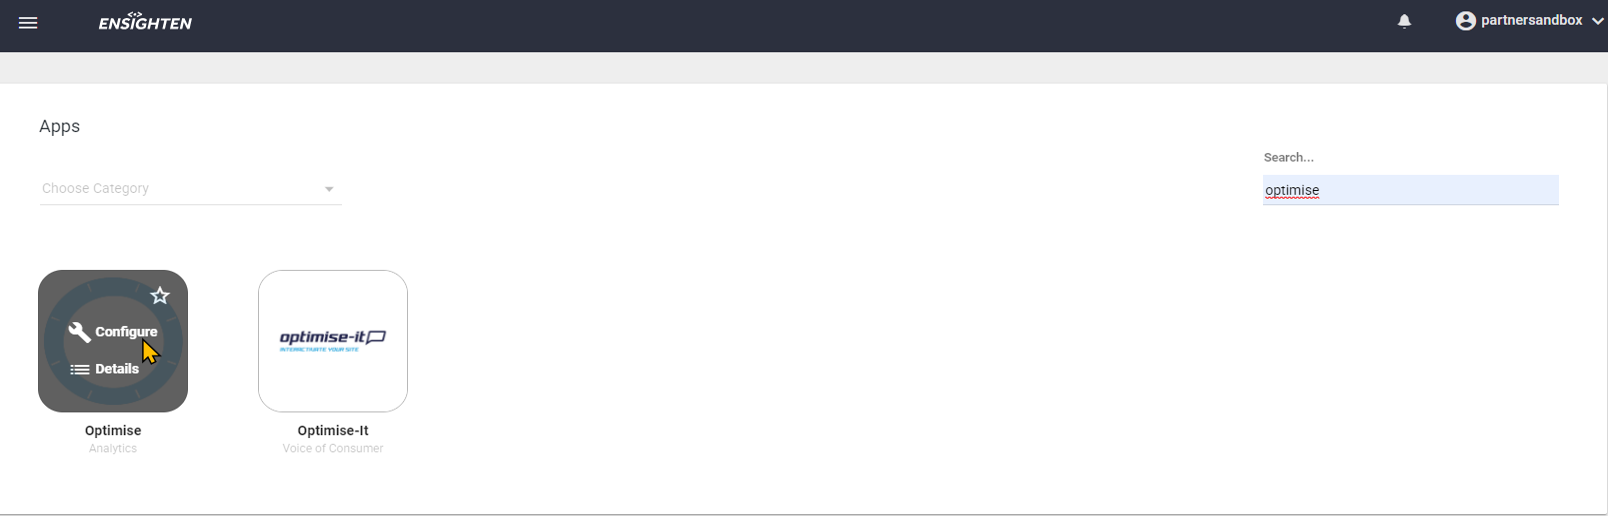
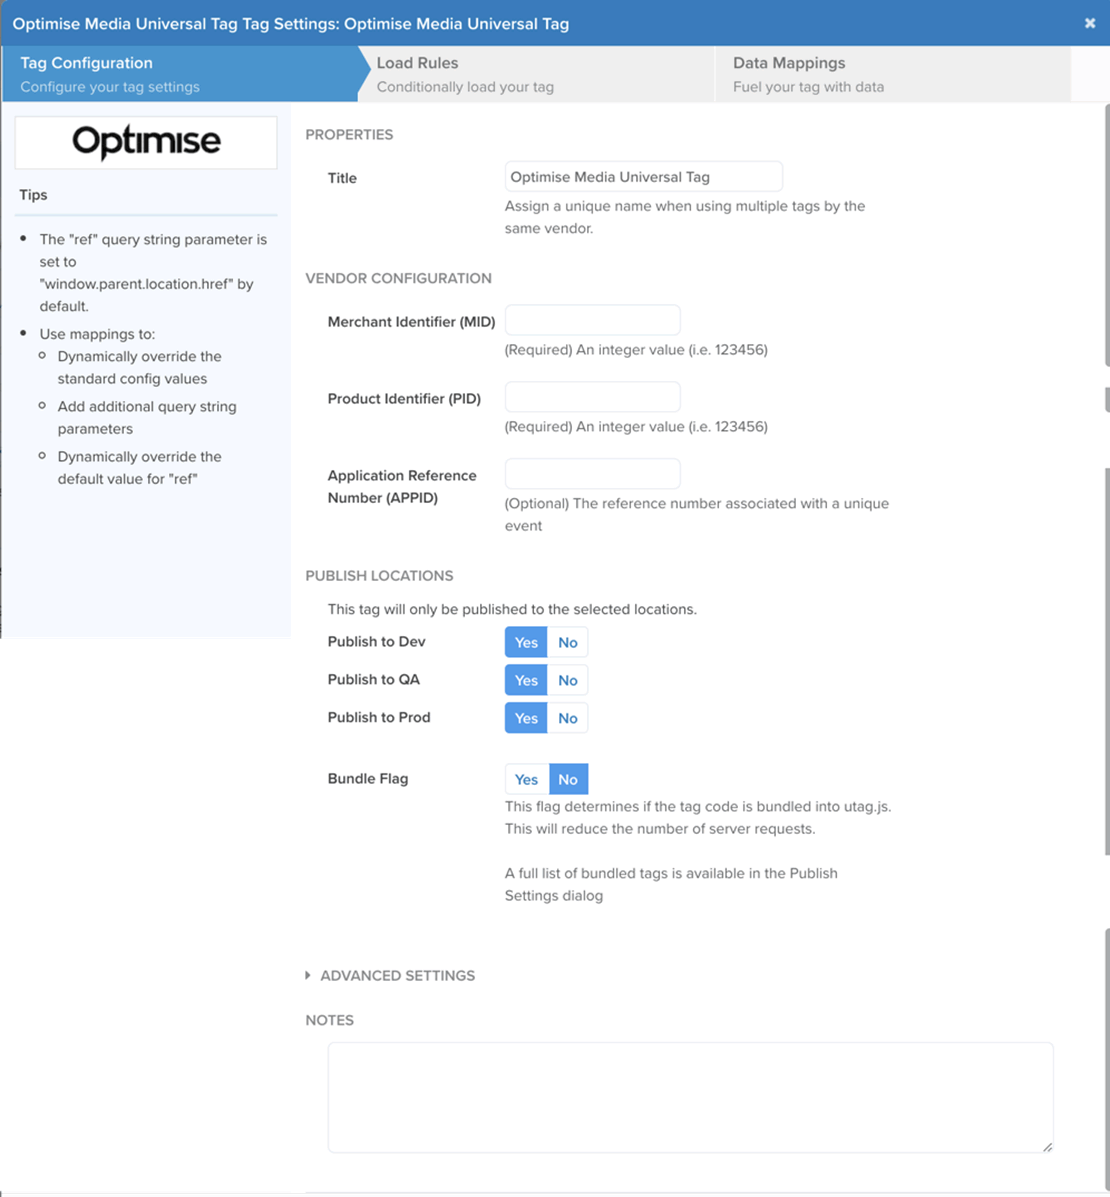
Optimise is configured in the Ensighten Apps Marketplace. To activate Optimise Universal Tracking Both the Universal Tag and Conversion Tag should be enabled.
Search and select Optimise in the Ensighten Apps Marketplace
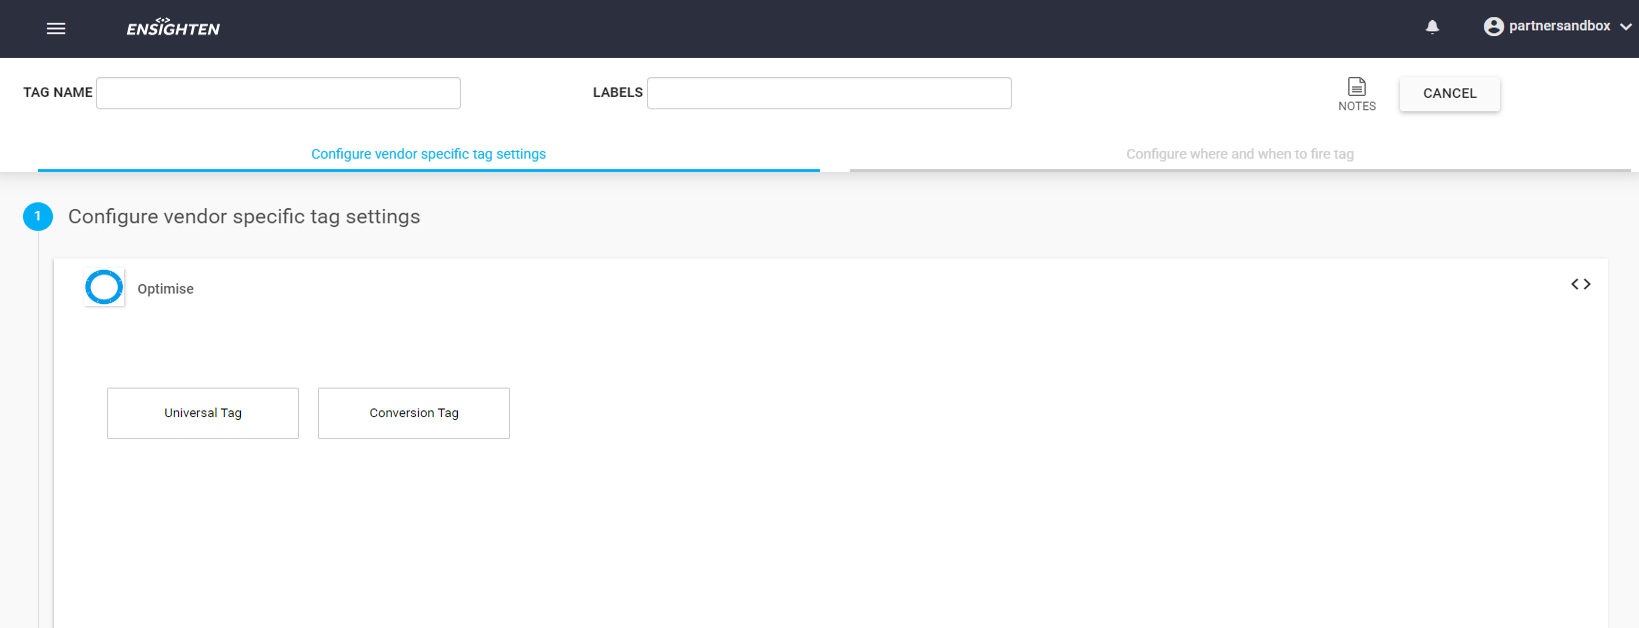
Select the tag to setup
Setup and configure Universal Tag
Fill in Merchant Identifier (MID) and the Product Identifier (PID) with the details provided by your Account Manager
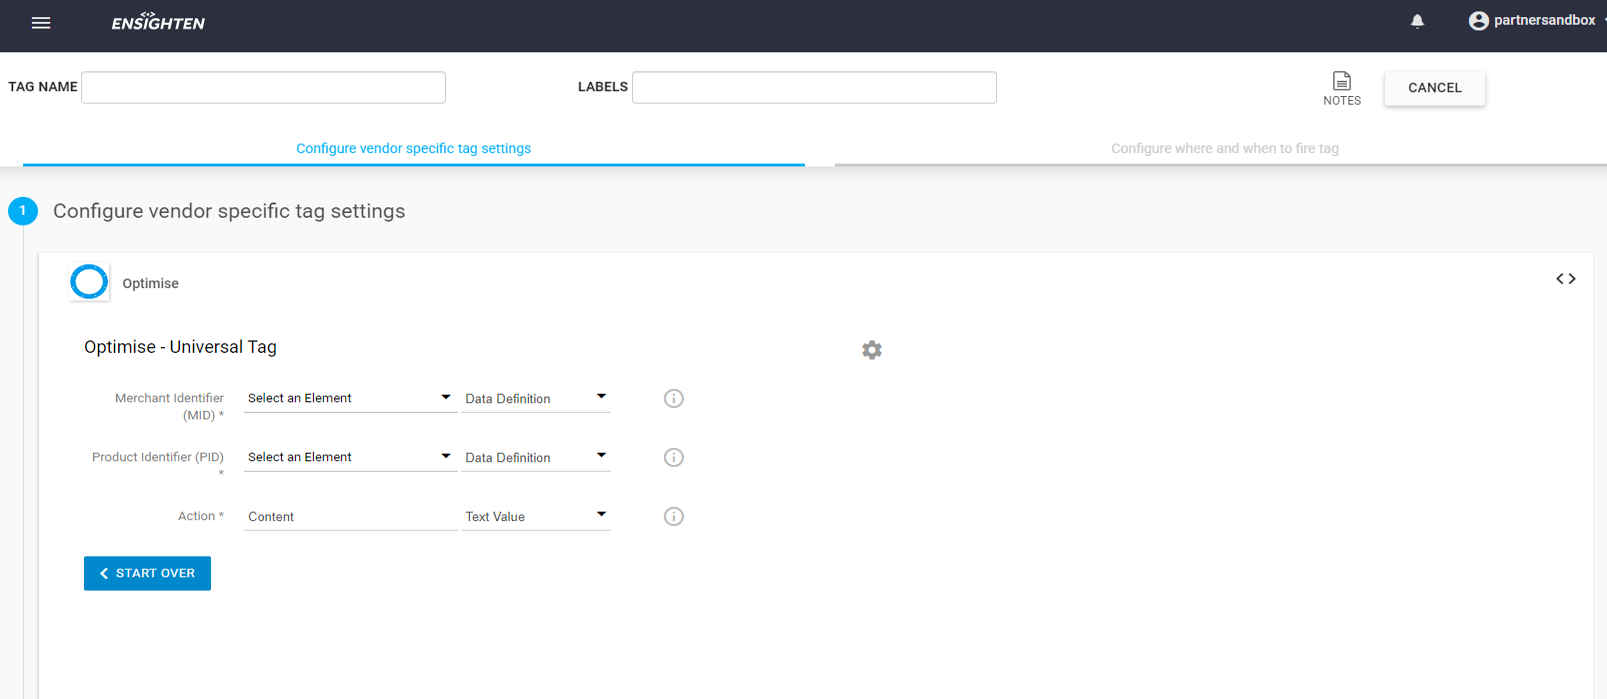
Example

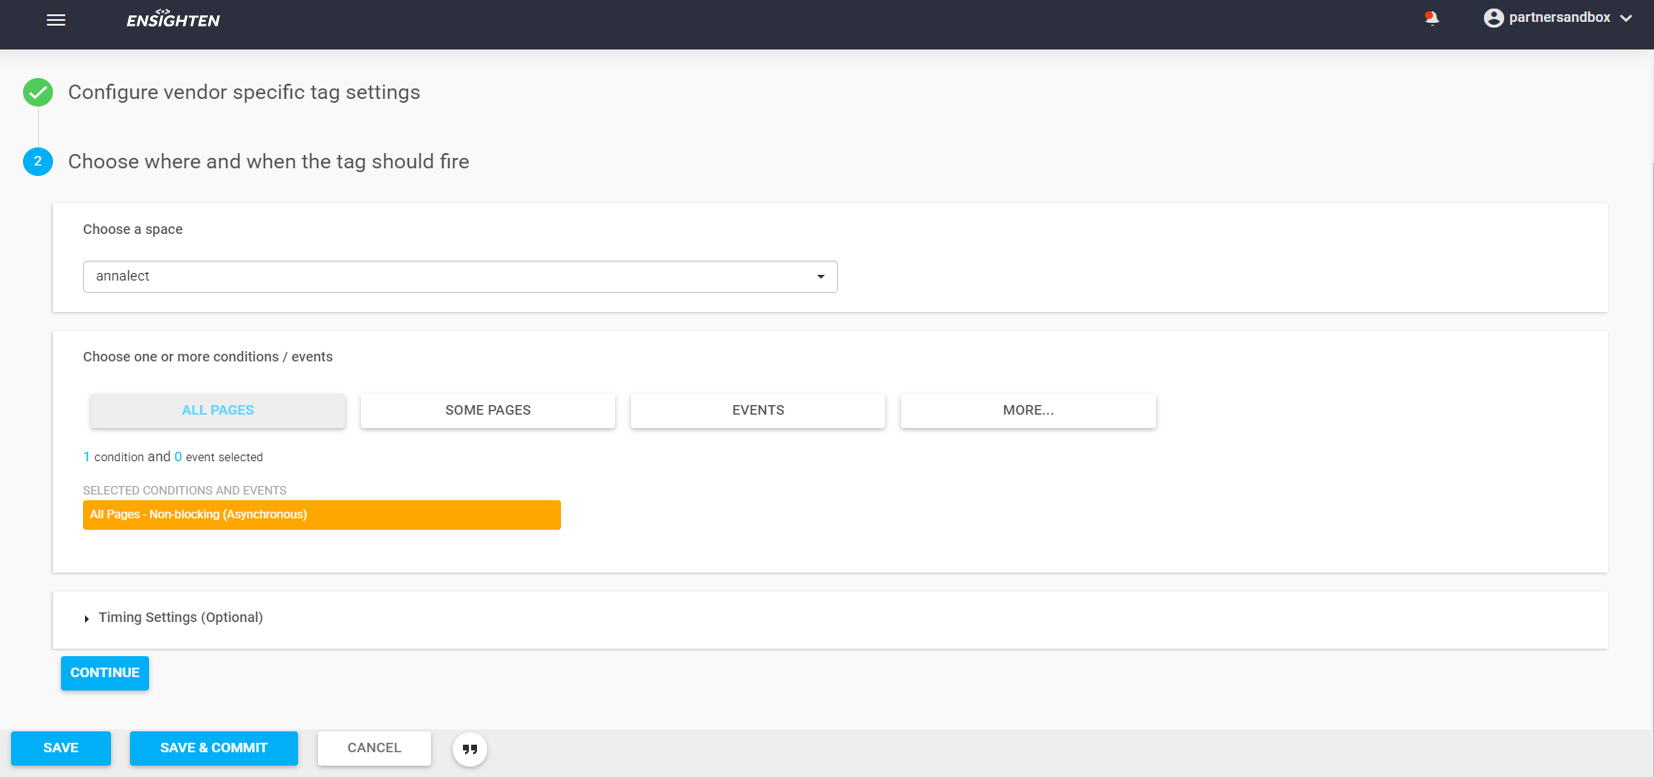
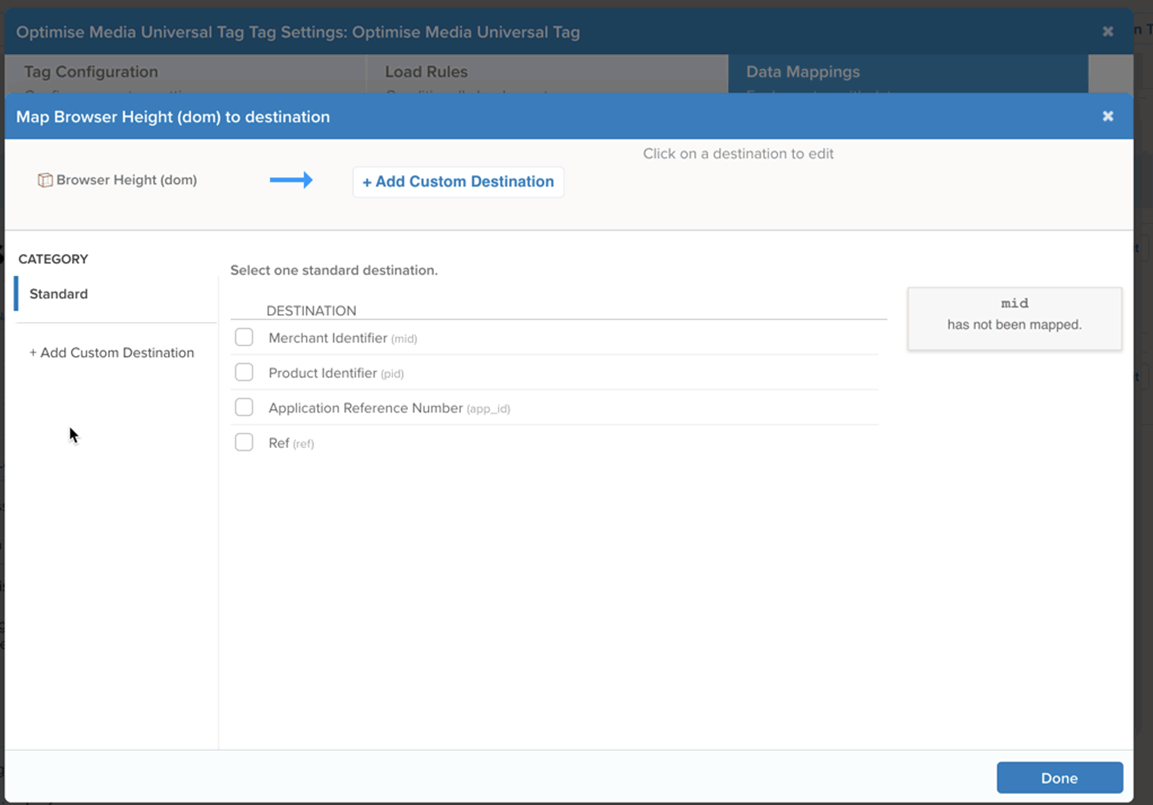
Setup Triggers for the Universal Tag
- Setup a trigger to determine when the tag should fire. This should normally be on All Pages
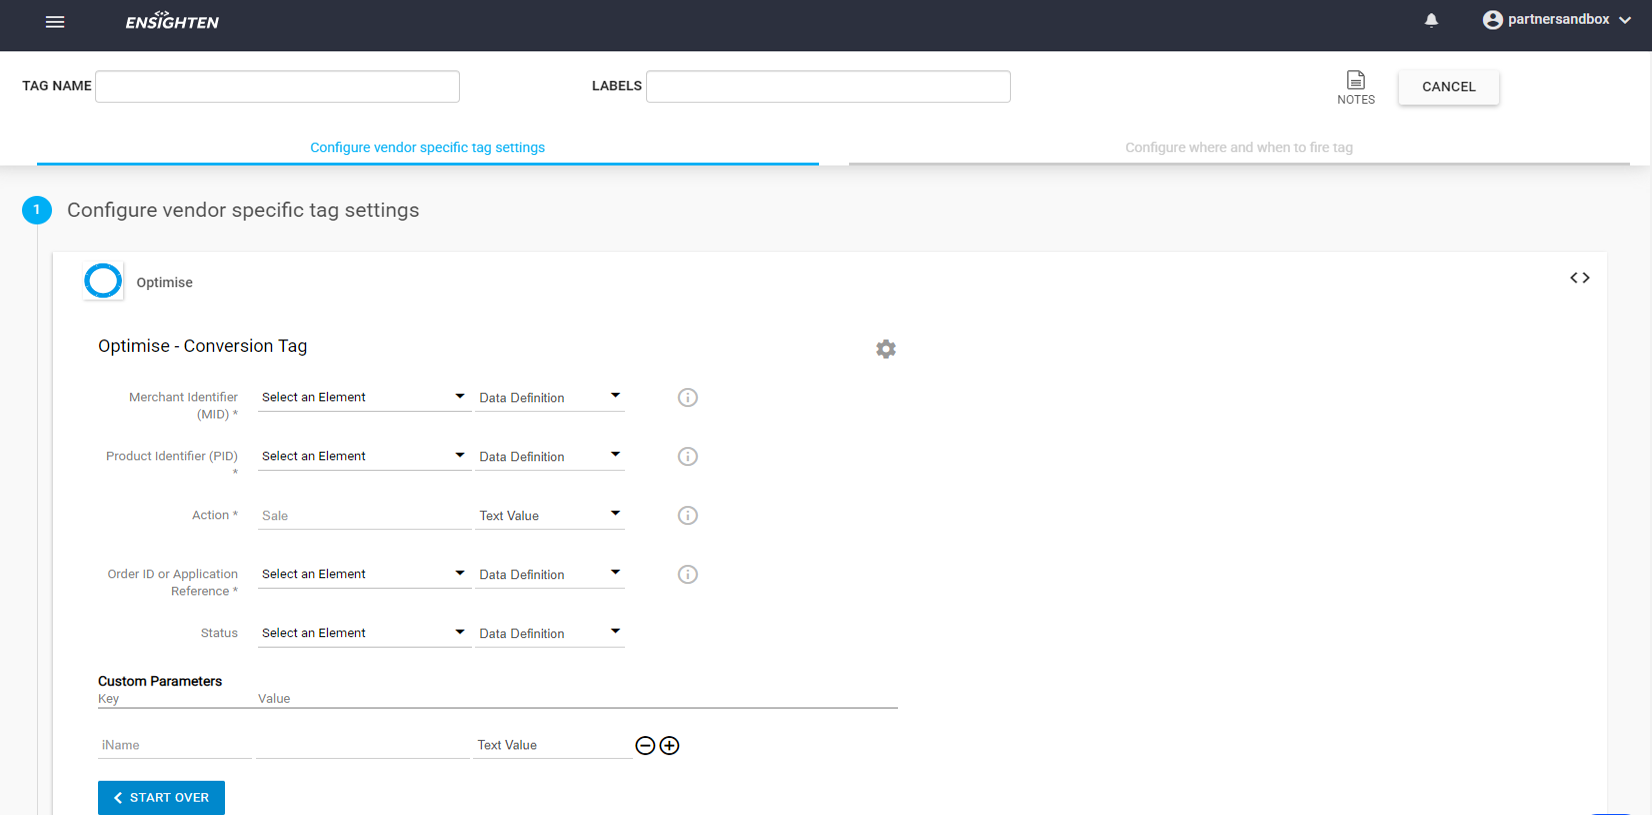
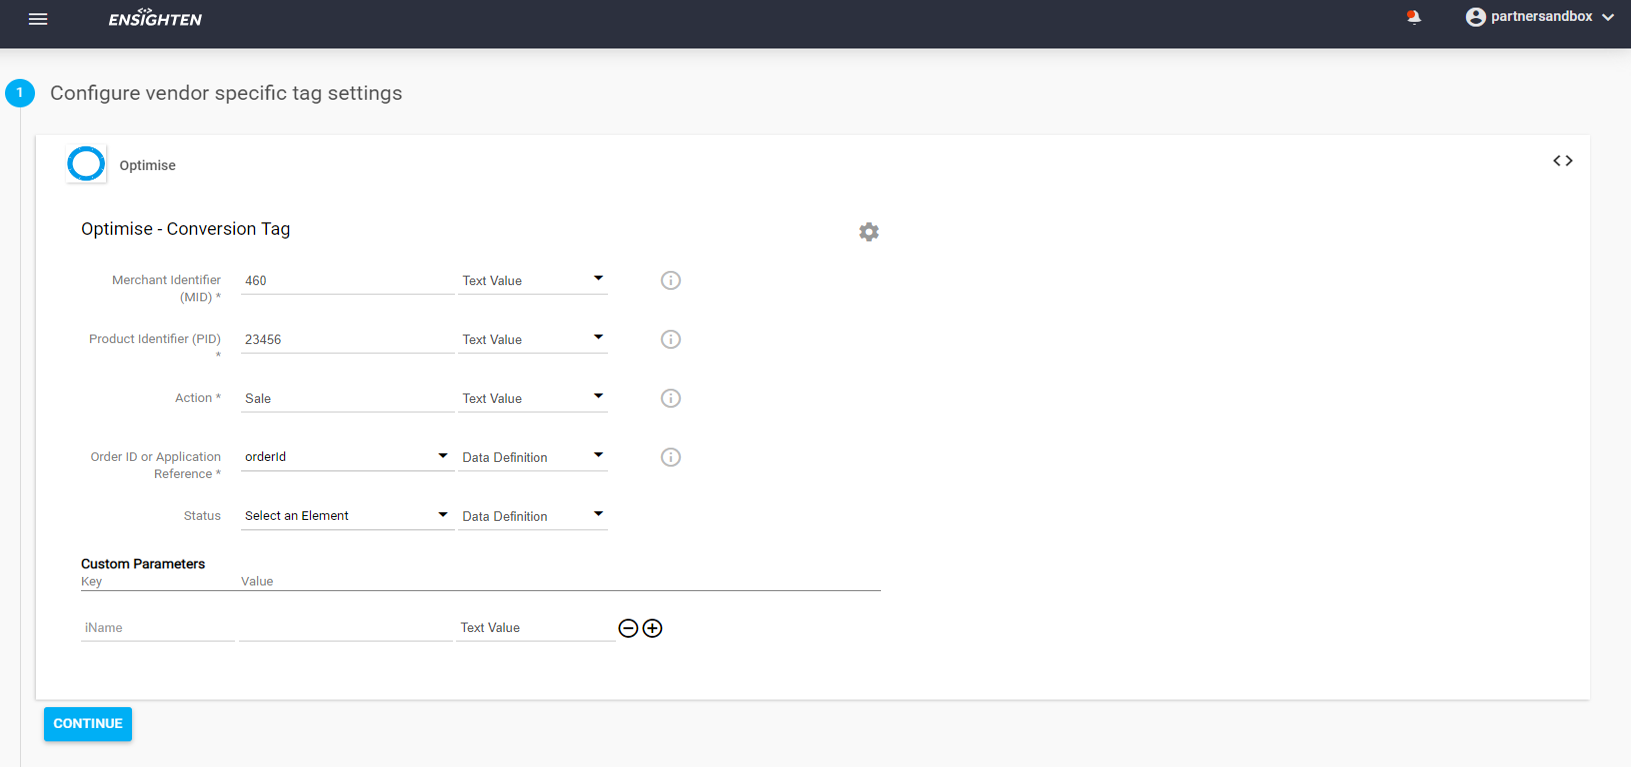
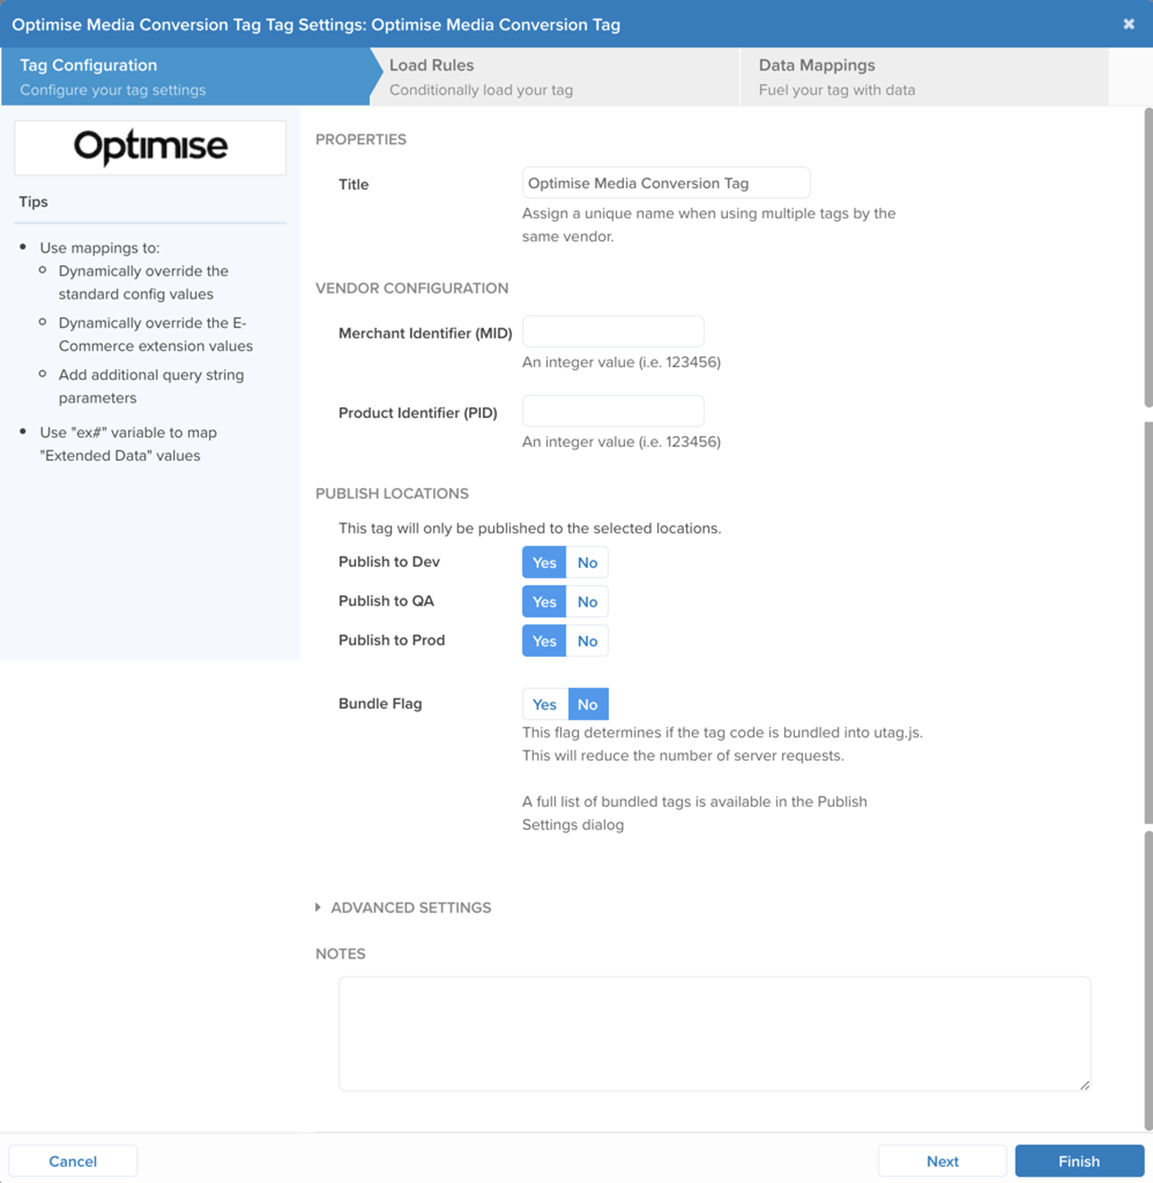
Setup and configure the Conversion Tag
Fill in Merchant Identifier (MID) and the Product Identifier (PID) with the details provided by your Account Manager. Action will need to be set to 'Sale' and the Order ID or Application Reference is the unique ID generated to attribute the sales across platforms
Example
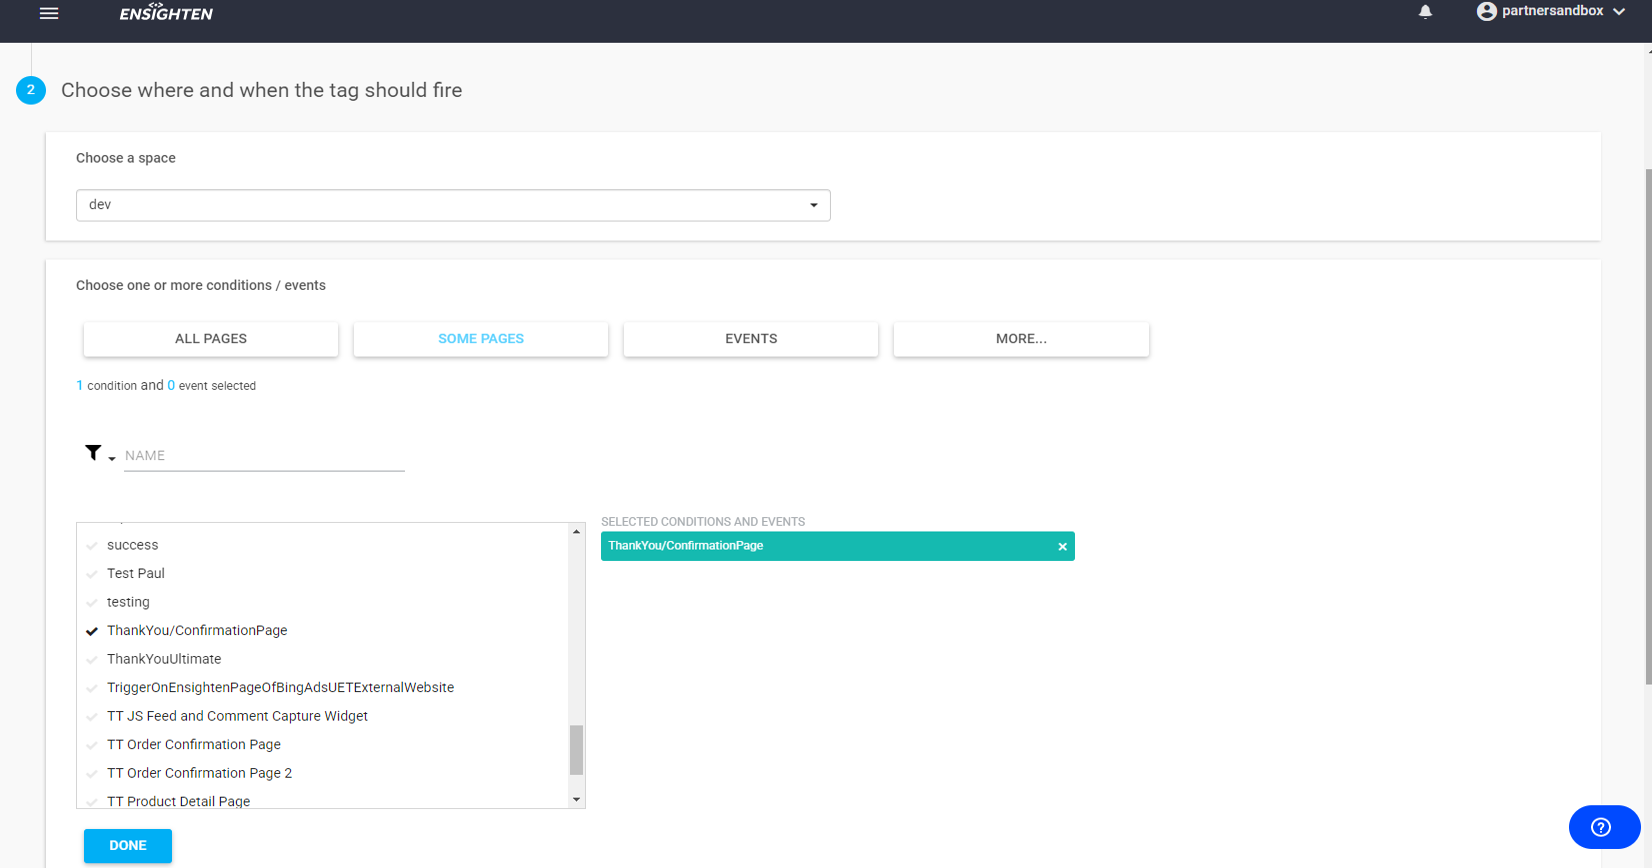
Setup Triggers for the Conversion Tag
- Setup a trigger to determine when the tag should fire. This needs to be on the page directly after the conversion takes place, usually the 'Thank you' page.
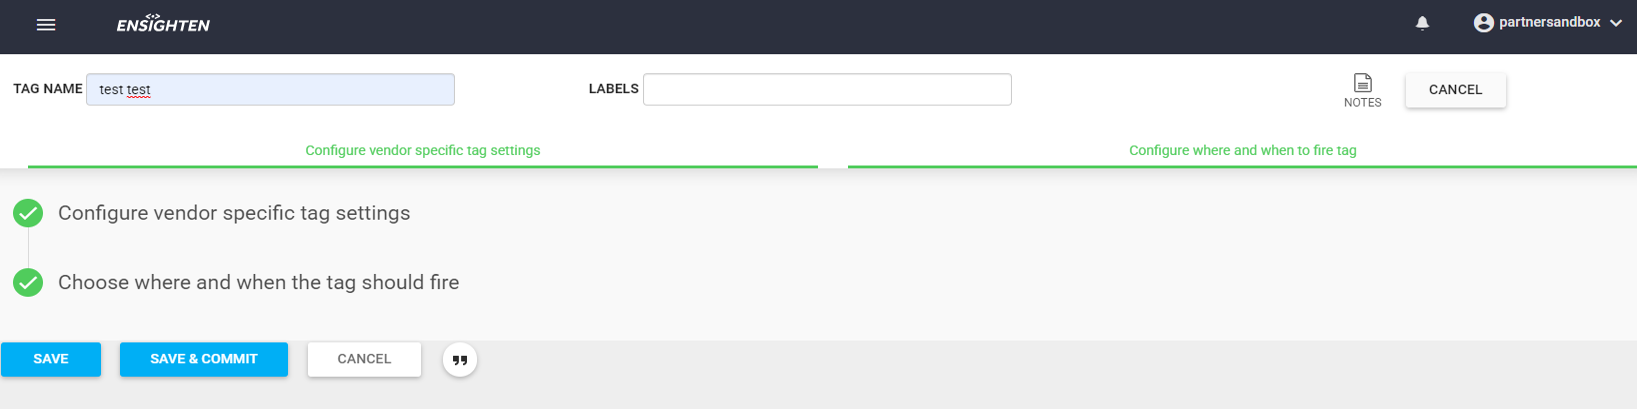
Naming, saving and publishing
Tealium
Optimise is configured in the Tealium Integrations Marketplace.
To activate Optimise Universal Tracking Both the Universal Tag and Conversion Tag should be enabled.
- https://tealium.com/integrations/optimisemedia_universaltag.php
- https://tealium.com/integrations/optimisemedia_conversiontag.php
Configure the Universal Tag
Enable the Optimise Universal Tag. Insert the MID & PID provided into the relevant fields.
If you're tracking a unique Action such as a Quote or Application, enter the reference number.
Configure the Conversion Tag
Enable the Optimise Universal Tag. Insert the MID & PID provided into the relevant fields.
If you are passing Extended Data enter the relevant data variables as shown below.
Impact
Impact supports client-side and server-side postbacks. We should implement a server-side postback and pass {sskey} into an impact subid parameter The below is an example template for a postback:
https://track.omguk.com/e/si/?APPID={ActionId}&MID=XXXX&PID=XXXX&Status={SaleAmount}&SSKEY={SubId1}&CUR={Currency}&iid={join(items, i, "{i.sku}", "|", "")}&iname={join(items, i, "{i.cat}", "|", "")}&Ival={join(items, i, "{i.amt}", "|", "")}&ivol={join(items, i, "{i.qty}", "|", "")}&icat={join(items, i, "{i.cat}", "|", "")}&EX1={RefCustomerCountry}&EX2={RefCustomerCity}&VCODE={PromoCode}
Note that the {ActionId} will return the Impact Radius OrderId not the Advertiser's OrderId. This should be fine if only validating against IR data. To track advertisers order we need to use {oid} macro The following code should be used to extract item/basket data:
&iid={join(items, i, "{i.sku}", "|", "")}&iname={join(items, i, "{i.name}", "|", "")}&val={join(items, i, "{i.amt}", "|", "")}&ivol={join(items, i, "{i.qty}", "|", "")}&icat={join(items, i, "{i.cat}", "|", "")}
List of Macros for Postbacks: https://help.impactradius.com/hc/en-us/articles/115002183068-Event-Postback-URL?flash_digest=04d1de05da7bd2a41c657b6838f52e3e137790ba&flash_digest=23441d498afdbe03ab
Partnerize
All integrations are via API. To integrate Partnerize please speak to your Account Manager.
Mobile App Tracking
Adding tracking onto your Mobile App and ensuring you have a robust deep linking strategy is an important part of any affiliate campaign.
As Cookies are not supported in the Mobile App environment you will need to select between either:
Enable deep linking in your App by configuring for Apple Universal Links & Android App Links
Mobile Attribution Providers
Appsflyer
Optimise can easily be integrated with Appsflyer. Follow the steps below to configure your campaign:
Installs, In-app events and Rejected Installs
- Log in to your Appsflyer account and select Configuration > Integrated Partners
- Search "Optimise" and click to configure
- Turn on "Activate Partner" and "In-App Events Postback" (Fig 1)
- Enter the Application Key provided under "General Settings" and also under "In-App Events Settings" (Fig 1)
- To add In App Events click "Add Event" (Fig 2):
- Select the "SDK Event Name"
- Enter a "Partner Event Identifier" - this needs to be name for the event without whitespaces that you send to Optimise
- Set "Sending Option" to "This Partner Only"
- Set "Send Revenue" to "Values & revenue"
- Under Permissions enable (Fig 3):
- "Allow to configure integration"
- "Allow to configure In-app event postbacks"
Fig 1

Fig 2

Fig 3

Adjust
Optimise can easily be integrated with Adjust. Provide a unique URL from your Adjust account to your Account Manager.
Branch
Optimise can easily be integrated with Branch. Provide a unique URL from your Branch account to your Account Manager.
Currency Conversion
If a site transacts in multiple currencies and needs to pass a currency value with each Conversion, this can be added to the Conversion tag.
The Conversion value will then convert to the Campaign currency during the tracking import process.
To achieve this, add &Cur={CurrencyCode} to the tag.
- All currency codes must be 3 digit according ISO 4217 standards. E.g., GBP, USD, SGD, INR, BRL, AUD
For example:
<script type="text/javascript"src="https://track.omguk.com/4301/e/ss/?APPID={SaleReference}&MID={MID}&PID={MID}&Status=&TransactionValue={TotalOrderValue}&VCode={VoucherCode}&Cur={CurrencyCode}"></script>
<noscript><img src="https://track.omguk.com/e/si/?APPID={SaleReference}&MID=4301&PID=4406&Status=&TransactionValue={TotalOrderValue}&VCode={VoucherCode}&Cur={CurrencyCode}" border="0" height="1" width="1"></noscript>
Extended Data
Up to 11 additional free-text values when a Sale/Conversion occurs. These values are referred to as Extended Data and can contain any alphanumeric data up to 50 characters. To capture Extended data simply add a new parameter in the format: &EX1={EX1-Value} Example Sale/Conversion Tag configured with 11 Extended Data values:
<script type="text/javascript" src="https://track.omguk.com/e/ss/?APPID={SaleReference}&MID=4301&PID=4406&Status=&TransactiontValue={SaleValue}&VCode={VoucherCode}&Ex1={EX1-Value}&Ex2={EX2-Value}&Ex3={EX3-Value}&Ex4={EX4-Value}&Ex5={EX5-Value}&Ex6={EX6-Value}&Ex7={EX7-Value}&Ex8={EX8-Value}&Ex9={EX9-Value}&Ex10={EX10-Value}&Ex11={EX11-Value}"></script>
<noscript> <img src="https://track.omguk.com/e/si/?APPID={SaleReference}&MID=4301&PID=4406&Status=&TransactionValue={SaleValue}&VCode={VoucherCode}&Ex1={EX1-Value}&Ex2={EX2-Value}&Ex3={EX3-Value}&Ex4={EX4-Value}&Ex5={EX5-Value}&Ex6={EX6-Value}&Ex7={EX7-Value}&Ex8={EX8-Value}&Ex9={EX9-Value}&Ex10={EX10-Value}&Ex11={EX11-Value}" border="0" height="1" width="1"> </noscript>
Extended data may also be used to assign different commissions depending on the value. Speak to your Account Manager if your require this.
It is strongly recommended that you do not include any personal data in Extended Data values. If you intend to include personal data you must notify your Account Manager in advance. Data may be shared with Publishers in reporting.
Basket Item Tracking
Optimise recommend adding Basket Tracking and this is required for the following:
- Dynamic commission based on the content of the basket. eg. award different commissions based on items within the basket
- Reporting of which individual products (or items) are being purchased within the shopping basket.
This can be achieved by adding the following Basket Item parameters to your Sale/Conversion Tag:
| Parameter | Requirement | Instructions |
|---|---|---|
| iName | Mandatory | The name of the basket item purchased † |
| iID | Mandatory | The SKU of the basket item purchased † |
| iVol | Mandatory | The amount of the basket item purchased † |
| iVal | Mandatory | The individual value of the basket item purchased † †† |
| iCat | Optional | The individual category of the basket item purchased † |
| iBrand | Optional | The brand of the basket item purchased † |
† If you are adding multiple values they must be separated by a pipe |
†† This is the value of an individual item. We will automatically calculate iVol x iVal
Additional basket item values are available. Please refer to the examples above for which data should be supplied
The following example demonstrates how the Item Values should be configured.
<script type="text/javascript" src="https://track.omguk.com/e/ss/?APPID={SaleReference}&MID={MID}&PID={MID}&Status=&TransactionValue={SaleValue}&VCode={VoucherCode}&iName={ItemName1}|{ItemName2}&iID={ItemID1}|{ItemID2}&iVol={ItemVolume1}|{ItemVolume2}&iVal={ItemValue1}|{Itemvalue2}&iCat={ItemCategory1}|{ItemCategory2}&iBrand{ItemBrand1}|{ItemBrand2}"></script>
<noscript>
<img src="https://track.omguk.com/e/si/?APPID={SaleReference}&MID={MID}&PID={MID}&Status=&TransactionValue={SaleValue}&VCode={VoucherCode}&iName={ItemName1}|{ItemName2}&iID={ItemID1}|{ItemID2}&iVol={ItemVolume1}|{ItemVolume2}&iVal={ItemValue1}|{Itemvalue2}&iCat={ItemCategory1}|{ItemCategory2}&iBrand{ItemBrand1}|{ItemBrand2}" border="0" height="1" width="1">
</noscript>
It is strongly recommended that you do not include any personal data in Extended Data values. If you intend to include personal data you must notify your Account Manager in advance. Data may be shared with Publishers in reporting.
Customer Type
To record the type of customer add the CustType parameter to the tracking tag.
Values should be new or existing. For example:
<script type="text/javascript" src="https://track.omguk.com/e/ss/?APPID={SaleReference}&MID={MID}&PID={MID}&Status=&TransactionValue={SaleValue}&VCode={VoucherCode}&CustType=New"></script>
<noscript><img src="https://track.omguk.com/e/si/?APPID={SaleReference}&MID=4301&PID=4406&Status=&TransactionValue={SaleValue}&VCode={VoucherCode}&CustType=New" border="0" height="1" width="1"></noscript>
Adding Channel
Where possible you should notify Optimise of the Channel to which Sale/Transaction is attributed. This can be achieved by adding &Channel= to your Sale Tag, for example:
<script type="text/javascript" src="https://track.omguk.com/e/ss/?APPID={SaleReference}&MID={MID}&PID={MID}&Status=&TransactionValue={SaleValue}&VCode={VoucherCode}&Channel={Channel}"></script>
<noscript><img src="https://track.omguk.com/e/si/?APPID={SaleReference}&MID=4301&PID=4406&Status=&TransactionValue={SaleValue}&VCode={VoucherCode}&Channel={Channel}" border="0" height="1" width="1"></noscript>
You should always pass &Channel=Optimise when a sale is attributed to an Optimise Affiliate.
We recommend using the following values in the Channel Parameter:
| Value | When to use |
|---|---|
| Optimise | When sale attributed to Optimise |
| PPC-Generic | When sale attributed to PPC Generic activity |
| PPC-Brand | When sale attributed to PPC Brand activity |
| Display | When sale attributed to Display activity |
| Non-Optimise-Aff | When sale attributed to Non Optimise Affiliate activity |
| Other | When sale attributed to any other channel |
You should always pass &Channel=Optimise when a sale is attributed to an Optimise Affiliate. We recommend using the following values in the Channel Parameter:
Cross Device Tracking with CustID
When available we recommend passing a Customer Identifier. This can be used to stitch sessions together and attribute conversions across devices.
<script type="text/javascript" src="https://track.omguk.com/e/ss/?APPID={SaleReference}&MID={MID}&PID={MID}&Status=&TransactionValue={SaleValue}&VCode={VoucherCode}&CustID={CustomerReference}"></script>
<noscript><img src="https://track.omguk.com/e/si/?APPID={SaleReference}&MID=4301&PID=4406&Status=&TransactionValue={SaleValue}&VCode={VoucherCode}&CustID={CustomerReference}" border="0" height="1" width="1"></noscript>
We recommend using a hashed version of the email address, phone number or customer reference number.
De-Duplication
If you are running your Affiliate Campaign with more than one Affiliate Network or you are using a Cross Channel De-duplication tool then you will need to consider how this will work with your Affiliate Campaign. Passing Channel Data can help with this.
Multiple Affiliate Networks
If you are running your Affiliate Campaign on multiple Affiliate Networks you will de-duplicate sales to avoid paying the same commission more than once.
This is typically achieved by adding a parameter to your website that can be used to track the referring traffic source. The example below uses a ref querystring parameter.
http://www.example.com/?ref=omg
This parameter’s value is usually stored in a cookie (with the same duration as the Optimise cookie) and then retrieved on the post-sale confirmation page to determine whether or not the Optimise Sale/Conversion Tracking Tag is displayed (also known as show/hide).
Where possible you should notify Optimise of the Channel to which Sale/Conversion is attributed. For further information see Adding Channel.
Unique Order Reference
It is important that your {SalesReference} is unique as we will use this to automatically de-duplicate your sales. If you are unable to generate a unique Sales Reference or Order Number please contact your Account Manager.
Testing Your Tracking
We will provide Click URLs to test the tracking setup. Two tests should be completed; A single session test and multi-session test should be completed. A multi-session test will test that Optimise tracking tags are activated when a visitor returns to the site at a later stage to complete a transaction.
There are two tools available to help you test your Tracking implementation:
- If you are using Google Chrome you can use the Optimise Tag Inspector Extension to check Optimise tags are being activated.
- You can also use the Tracking Debug Tool under Tools > Tracking on Dashboard.
If using a third-party tracking provider (E.g., DoubleClick), or in-house attribution logic (show/hide), you will need to provide Optimise with a redirect URL to add to our systems before completing a test.
Single session test
- Delete browser cookies.
- Click on the Test URL provided - this should redirect to your website. Ensure that the URL redirects to the correct landing page and that the correct values (QueryString Parameters) are being passed to your landing page.
- On any pages where you have implemented a Universal Tag you should check the presence of the Universal Tag using the Optimise Tag Inspector.
- From your landing page either place an item in your basket or fill out the form to obtain a quote or generate a lead or application.
- Complete the full sale, lead or application process. On your post-sale confirmation page where you have placed your Conversion Tag you should check the Tag configuration using the Optimise Tag Inspector. Note: If your site is making a direct Server to server call to Optimise you won't see this from your browser
- Refresh the post-sale confirmation page several times.
- Check the Conversions Report in your account and you should see one conversion recorded. If you do not see this conversion (or you see duplicate transactions) double-check your Conversion Tag / S2s postback is configured correctly.
- Verify that the unique sale reference (Order ID) is displayed (unless alternative arrangements are agreed this will be needed for validating tracked activity).
- Repeat the above for each campaign.
Multi session test
- Delete browser cookies.
- Click on the Test URL provided - this should redirect to your website.
- Go to your browser's privacy settings, locate and delete all track.omguk.com cookies (this is to ensure our 1st party advertiser cookie is tested).
- Close the browser, re-open it and go directly to your site (do not click on any sponsored search results).
- On any pages where you have implemented a Universal Tag you should check the presence of the Universal Tag using the Optimise Tag Inspector.
- From your landing page either place an item in your basket or fill out the form to obtain a quote or generate a lead or application.
- Complete full sale, lead or application process. On your post-sale confirmation page where you have placed your conversion Tag you should check the Tag configuration using the Optimise Tag Inspector. Note: If your site is making a direct Server to server call to Optimise you won't see this from your browser.
- Check the Conversions Report in your account and you should see one conversion recorded. If you do not see this conversion, double-check your Conversion Tag / S2S postback is configured correctly.
- Verify that the unique sale reference (Order ID) is displayed (unless alternative arrangements are agreed this will be needed for validating tracked activity).
- Repeat the above for each campaign.
Tracking Debug Tool
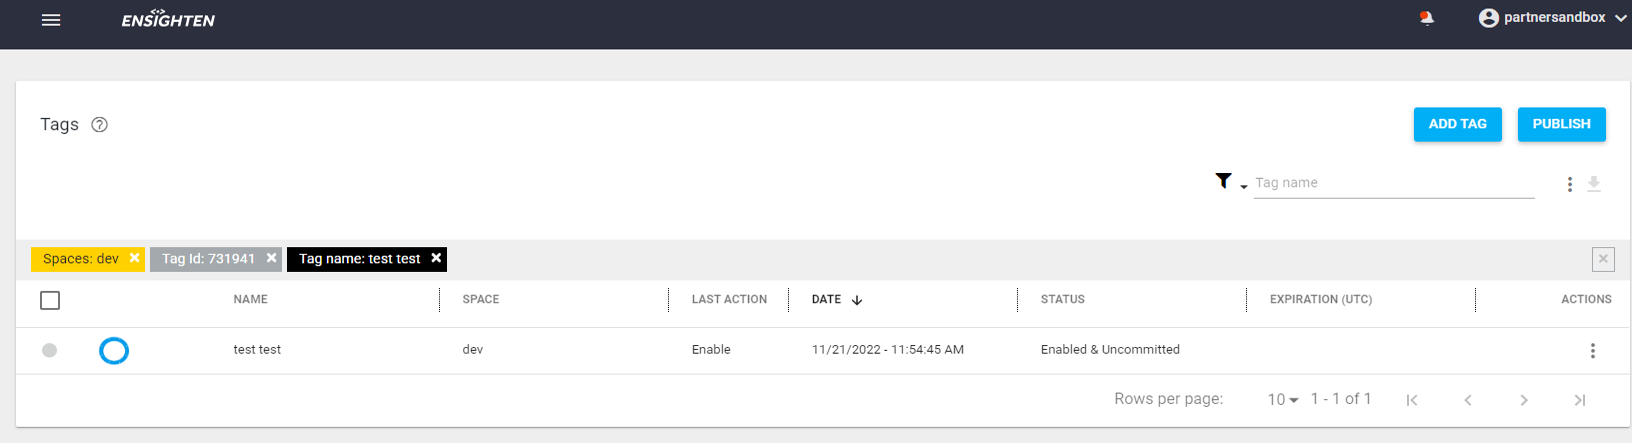
The Tracking Debug tool can be found under Tools > Tracking on Dashboard and an be useful for diagnosing issues with Optimise Tracking Tags in real-time.
![]()
To get started select the Campaign that you want to test.
This will load a default website URL to run the test against. You can change this URL to any address where you have Tracking Tags installed such as UAT or Production environment.
Click START DEBUGGING and this will launch a new window which opens the URL defined above.
If a Tracking Tag is configured on this page it will instantly send a response back to the Tracking Debug Tool showing the details of the Tracking Tag. As you navigate through the website you will see each a new line each time the Tool registers a new Tracking Tag Event.
Optimise Tag Inspector
Optimise Tag Inspector is a Google Chrome Extension that makes it easy to see and verify your tracking tags are correctly implemented.
Download Extension
You can install the Extension here from the Chrome Web Store: https://chrome.google.com/webstore/detail/optimise-tag-inspector/ekiippaneofjfjgokhonnfbpjlmmajdc.
Using the extension
- Open a URL where an Optimise Tag is installed.
- Simply click on the icon in your Chrome Toolbar (see below).
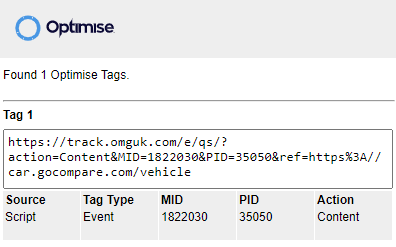
- If a tags are identified these will be detailed in the popup window.
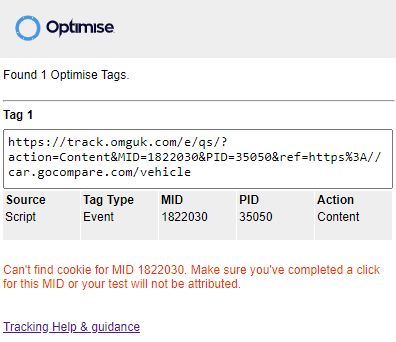
Warnings
No Cookie
If a cookie for your campaign cannot be found you will see the warning detailed below. To resolve this click on the Test URL you were provided.
No PID or No MID found
The tag is misconfigured and does not contain a valid MID or PID value. These should be numerical values. Please check these values against the tags that you were sent by your Account Manager.
No AppID found
Your Transaction tag must contain a unique AppID value. This is typically a unique order or sale reference that can be used to match the Transaction offline for validation purposes. If you do not require offline validation then a random unique value can be generated and populated.
No Action found
Your Event tag must contain a valid Action. Please check the Event Tags guide for valid &Action= values.